APIGW 通信制御の実施
1. NICのトラフィック分割(Canary Release)
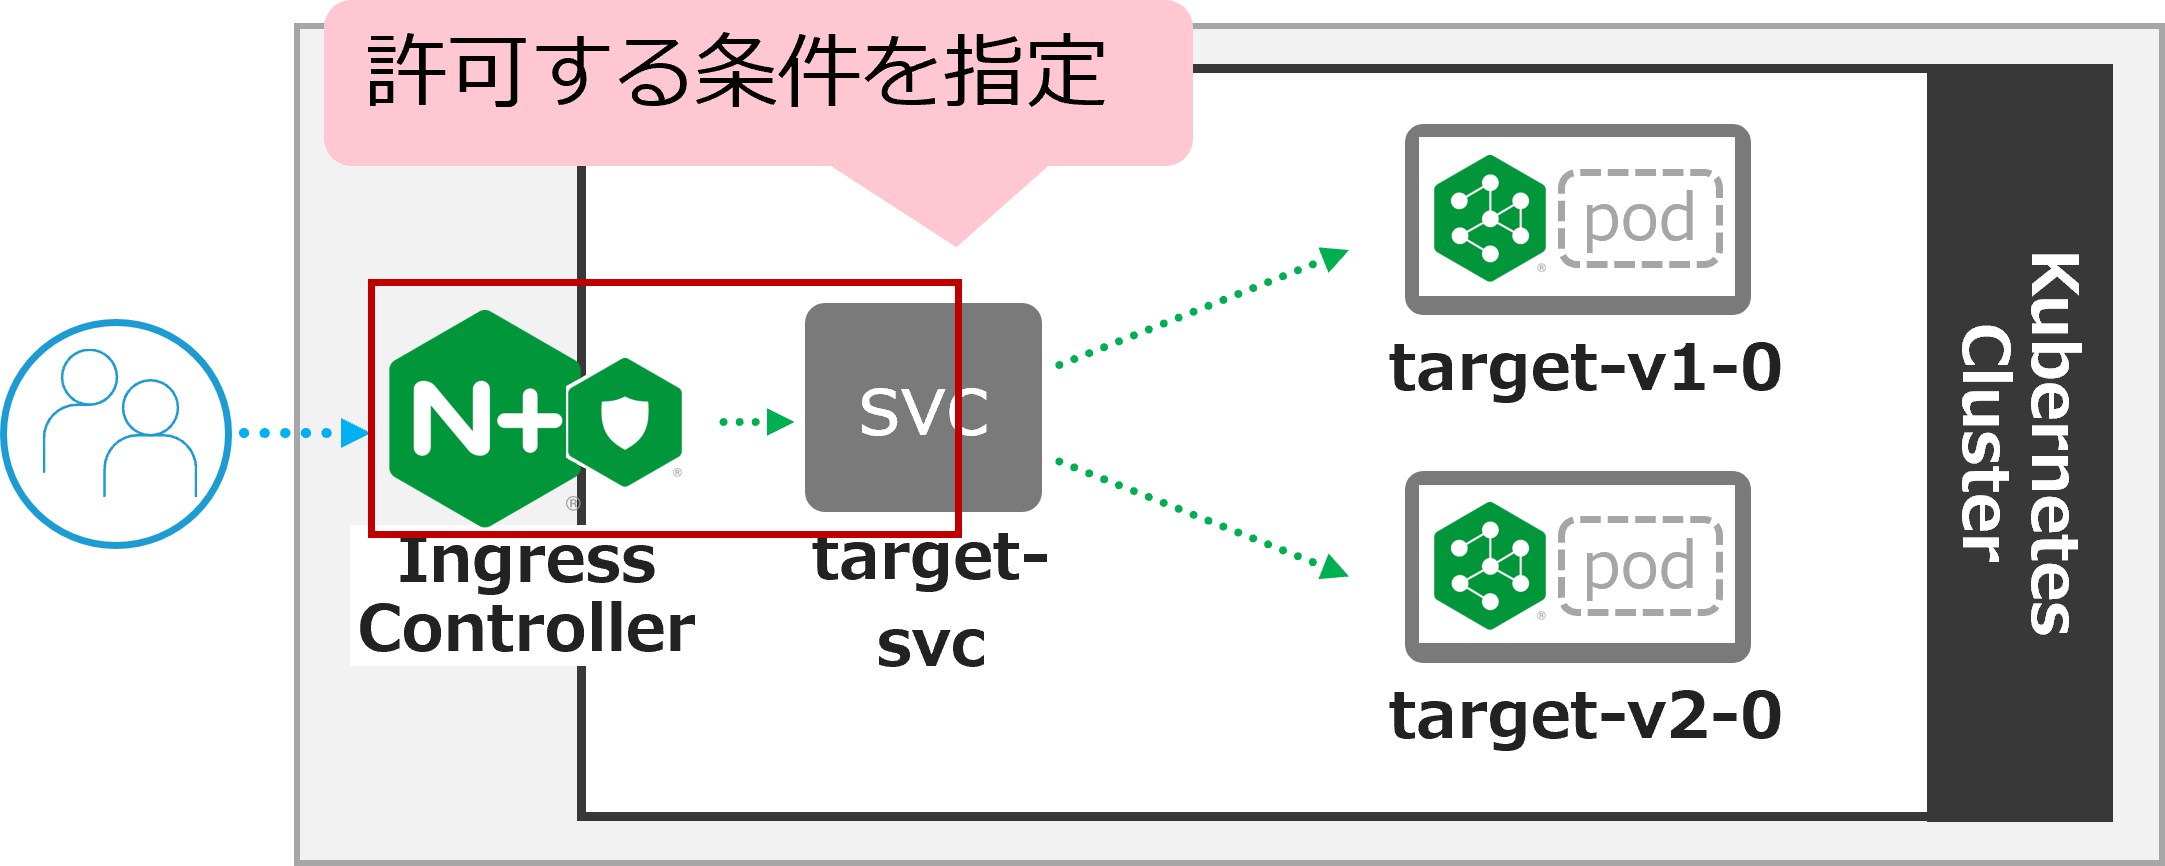
以下の構成で動作を確認します
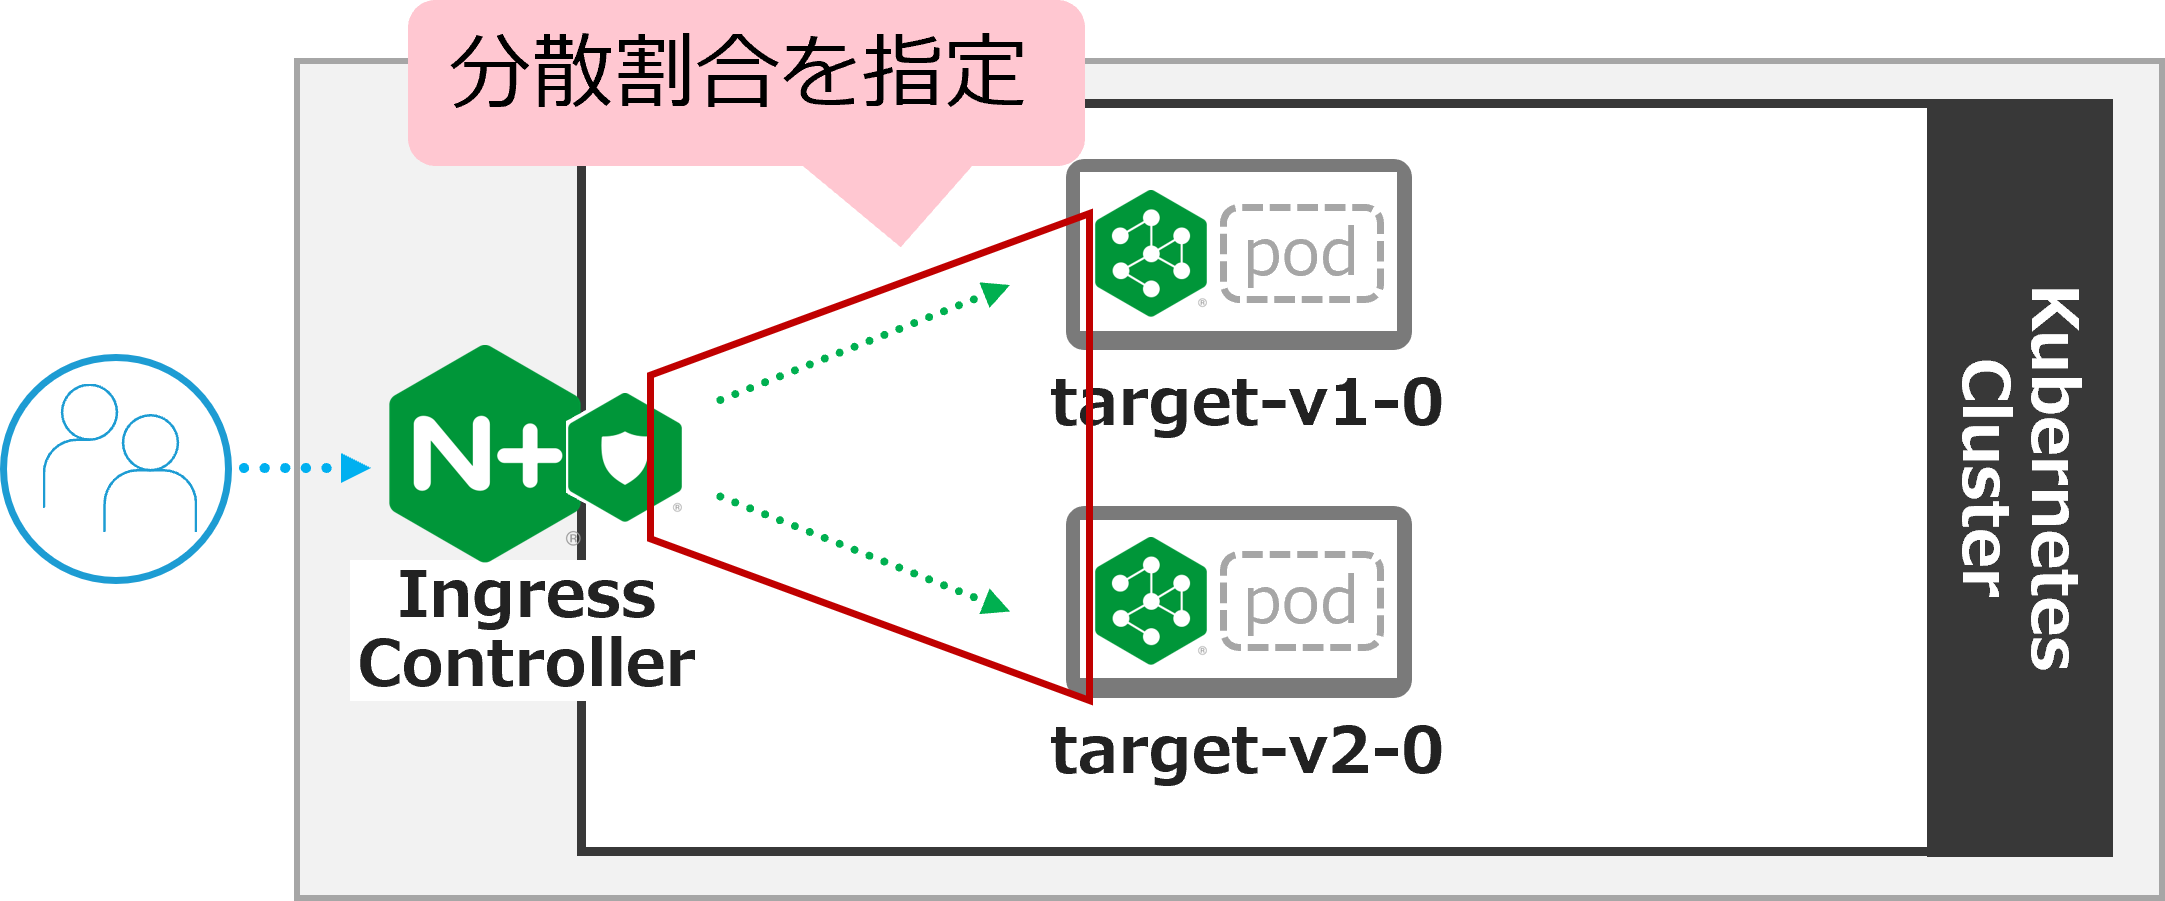
NICの背後にあるアプリケーションのトラフィック分割が求められる状況を想定した構成となります。
1. 設定のデプロイ (割合9:1)
設定の内容を確認します
## cd ~/f5j-nginx-k8s-apigw-lab/example
cat split-nic-vs/nic-vs-split1.yaml
 1apiVersion: k8s.nginx.org/v1
 2kind: VirtualServer
 3metadata:
 4  name: nic
 5spec:
 6  host: nic.example.com
 7  upstreams:
 8  - name: target-v1
 9    service: target-v1-0
10    port: 80
11  - name: target-v2
12    service: target-v2-0
13    port: 80
14  routes:
15  - path: /
16    splits:
17    - weight: 90
18      action:
19        pass: target-v1
20    - weight: 10
21      action:
22        pass: target-v2
Upstreamとして 8-9行目
target-v1-0を、 11-12行目target-v2-0を転送先サービスとして指定しています17-19行目で、
target-v1-0に対しwegiht 90(90%)、20-22行目で、target-v2-0に対しwegiht 10(10%)の割合を指定して転送します
設定をデプロイします
## cd ~/f5j-nginx-k8s-apigw-lab/example
kubectl apply -f split-nic-vs/nic-vs-split1.yaml -n staging
正しく反映されたことを確認します
kubectl get vs nic -n staging
1NAME   STATE   HOST              IP    PORTS   AGE
2nic    Valid   nic.example.com                 49s
STATEが Valid であることを確認します
2. 動作確認 (割合9:1)
正しく疎通があることを確認します
curl -s -H "Host: nic.example.com" http://localhost/
1target v1.0
複数回実行いただくと target v1.0 または target v2.0 が応答され、2種類のVersionのアプリケーションから応答されている状況が確認いただけます。
以下のコマンドで 20回 リクエストを送付します。結果を確認します
for i in {1..20}; do curl -s -H "Host: nic.example.com" http://localhost/ ; done ;
 1target v1.0
 2target v1.0
 3target v1.0
 4target v1.0
 5target v2.0
 6target v1.0
 7target v1.0
 8target v1.0
 9target v2.0
10target v1.0
11target v1.0
12target v1.0
13target v1.0
14target v1.0
15target v1.0
16target v1.0
17target v1.0
18target v1.0
19target v1.0
20target v1.0
v1 と v2 が指定の値に近い割合で応答が返答されていることが確認できます。
3. 設定のデプロイ (割合2:8)
設定の内容を確認します
## cd ~/f5j-nginx-k8s-apigw-lab/example
cat split-nic-vs/nic-vs-split2.yaml
 1apiVersion: k8s.nginx.org/v1
 2kind: VirtualServer
 3metadata:
 4  name: nic
 5spec:
 6  host: nic.example.com
 7  upstreams:
 8  - name: target-v1
 9    service: target-v1-0
10    port: 80
11  - name: target-v2
12    service: target-v2-0
13    port: 80
14  routes:
15  - path: /
16    splits:
17    - weight: 20
18      action:
19        pass: target-v1
20    - weight: 80
21      action:
22        pass: target-v2
Upstreamは変更ありません
17-19行目で、
target-v1-0に対しwegiht 20(20%)、20-22行目で、target-v2-0に対しwegiht 80(80%)の割合を指定して転送します。V2の安定した動作が確認できたため割合を増加する想定のシナリオとなります
設定をデプロイします
## cd ~/f5j-nginx-k8s-apigw-lab/example
kubectl apply -f split-nic-vs/nic-vs-split2.yaml -n staging
正しく反映されたことを確認します
kubectl get vs nic -n staging
1NAME   STATE   HOST              IP    PORTS   AGE
2nic    Valid   nic.example.com                 49s
STATEが Valid であることを確認します
4. 動作確認 (割合2:8)
以下のコマンドで 20回 リクエストを送付します。結果を確認します
for i in {1..20}; do curl -s -H "Host: nic.example.com" http://localhost/ ; done ;
 1target v2.0
 2target v2.0
 3target v1.0
 4target v2.0
 5target v2.0
 6target v2.0
 7target v2.0
 8target v2.0
 9target v2.0
10target v2.0
11target v2.0
12target v1.0
13target v2.0
14target v2.0
15target v2.0
16target v2.0
17target v2.0
18target v1.0
19target v1.0
20target v2.0
先程の内容から割合を変更したため、 v2 が多くなっています。
v1 と v2 が指定の値に近い割合で応答が返答されていることが確認できます。
5. 不要設定の削除
不要な設定を削除します
## cd ~/f5j-nginx-k8s-apigw-lab/example
kubectl delete -f split-nic-vs/nic-vs-split2.yaml -n staging
2. NSMのトラフィック分割(Canary Release)
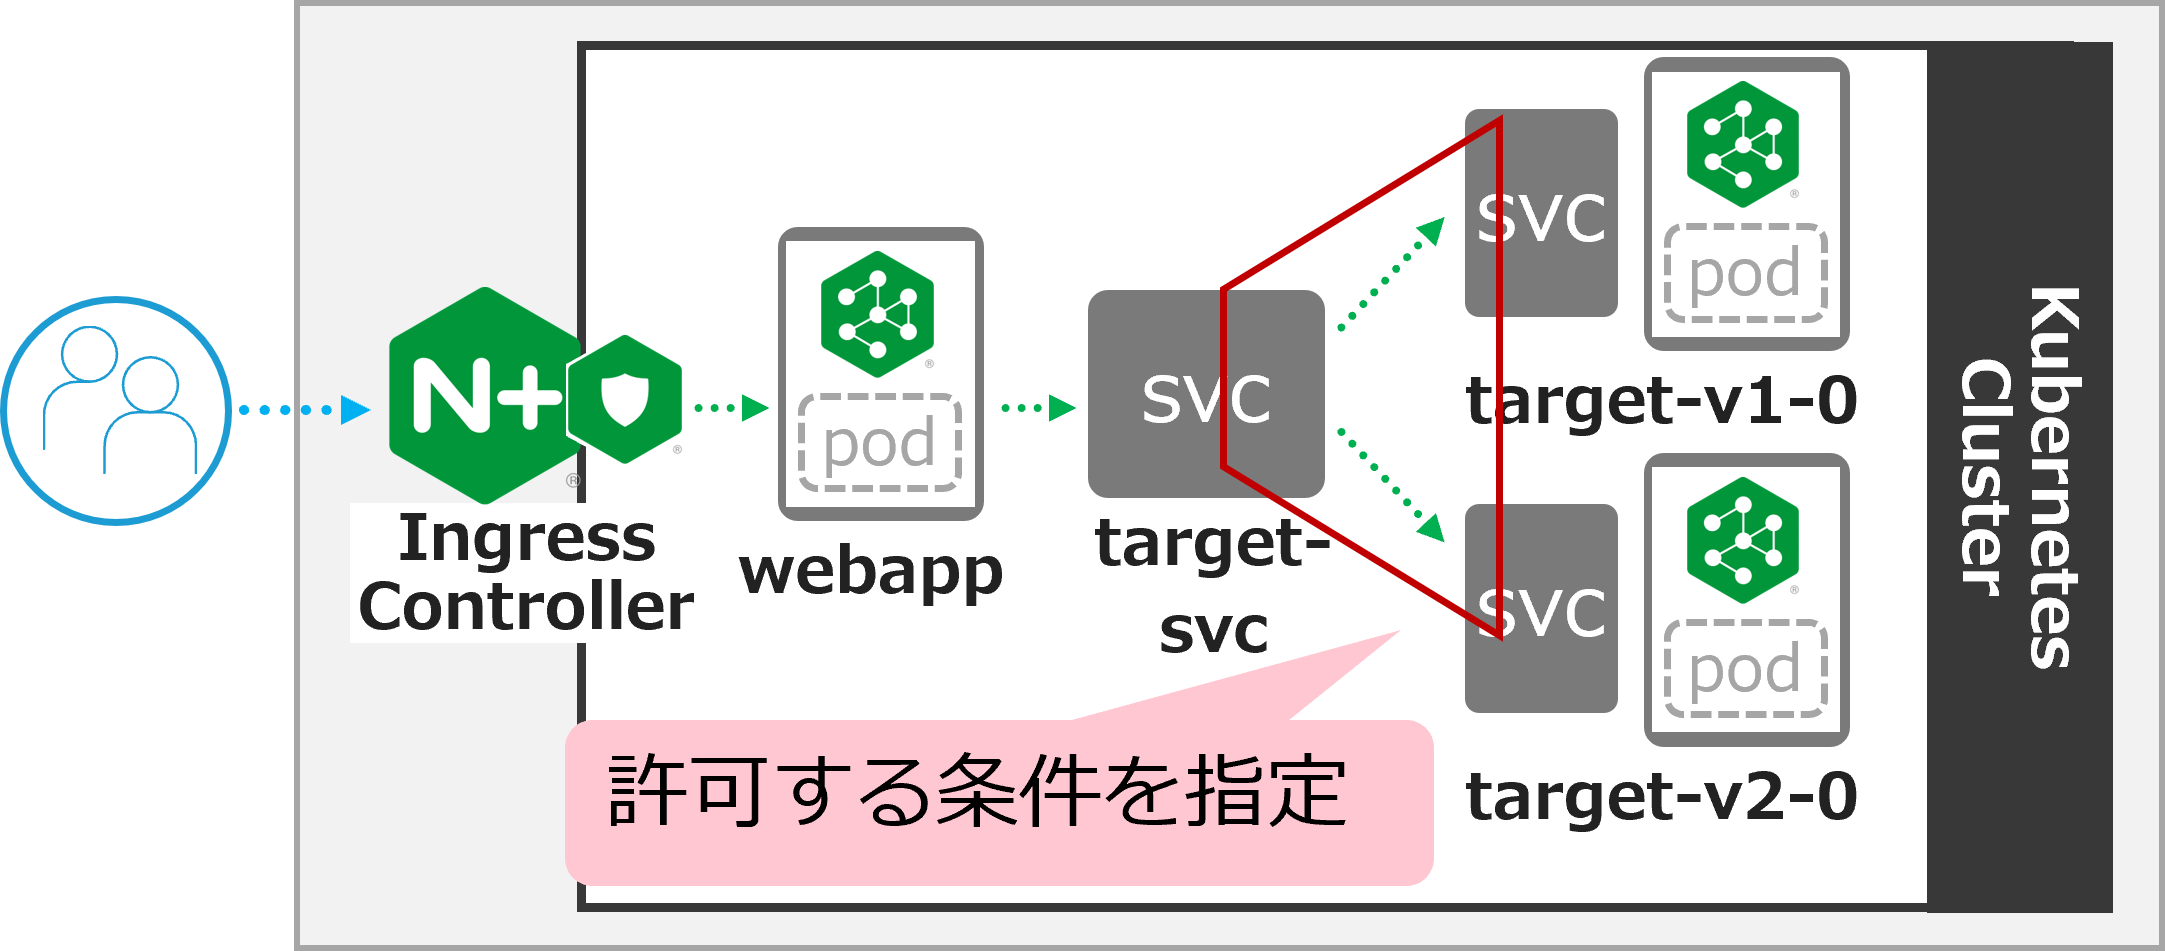
以下の構成で動作を確認します
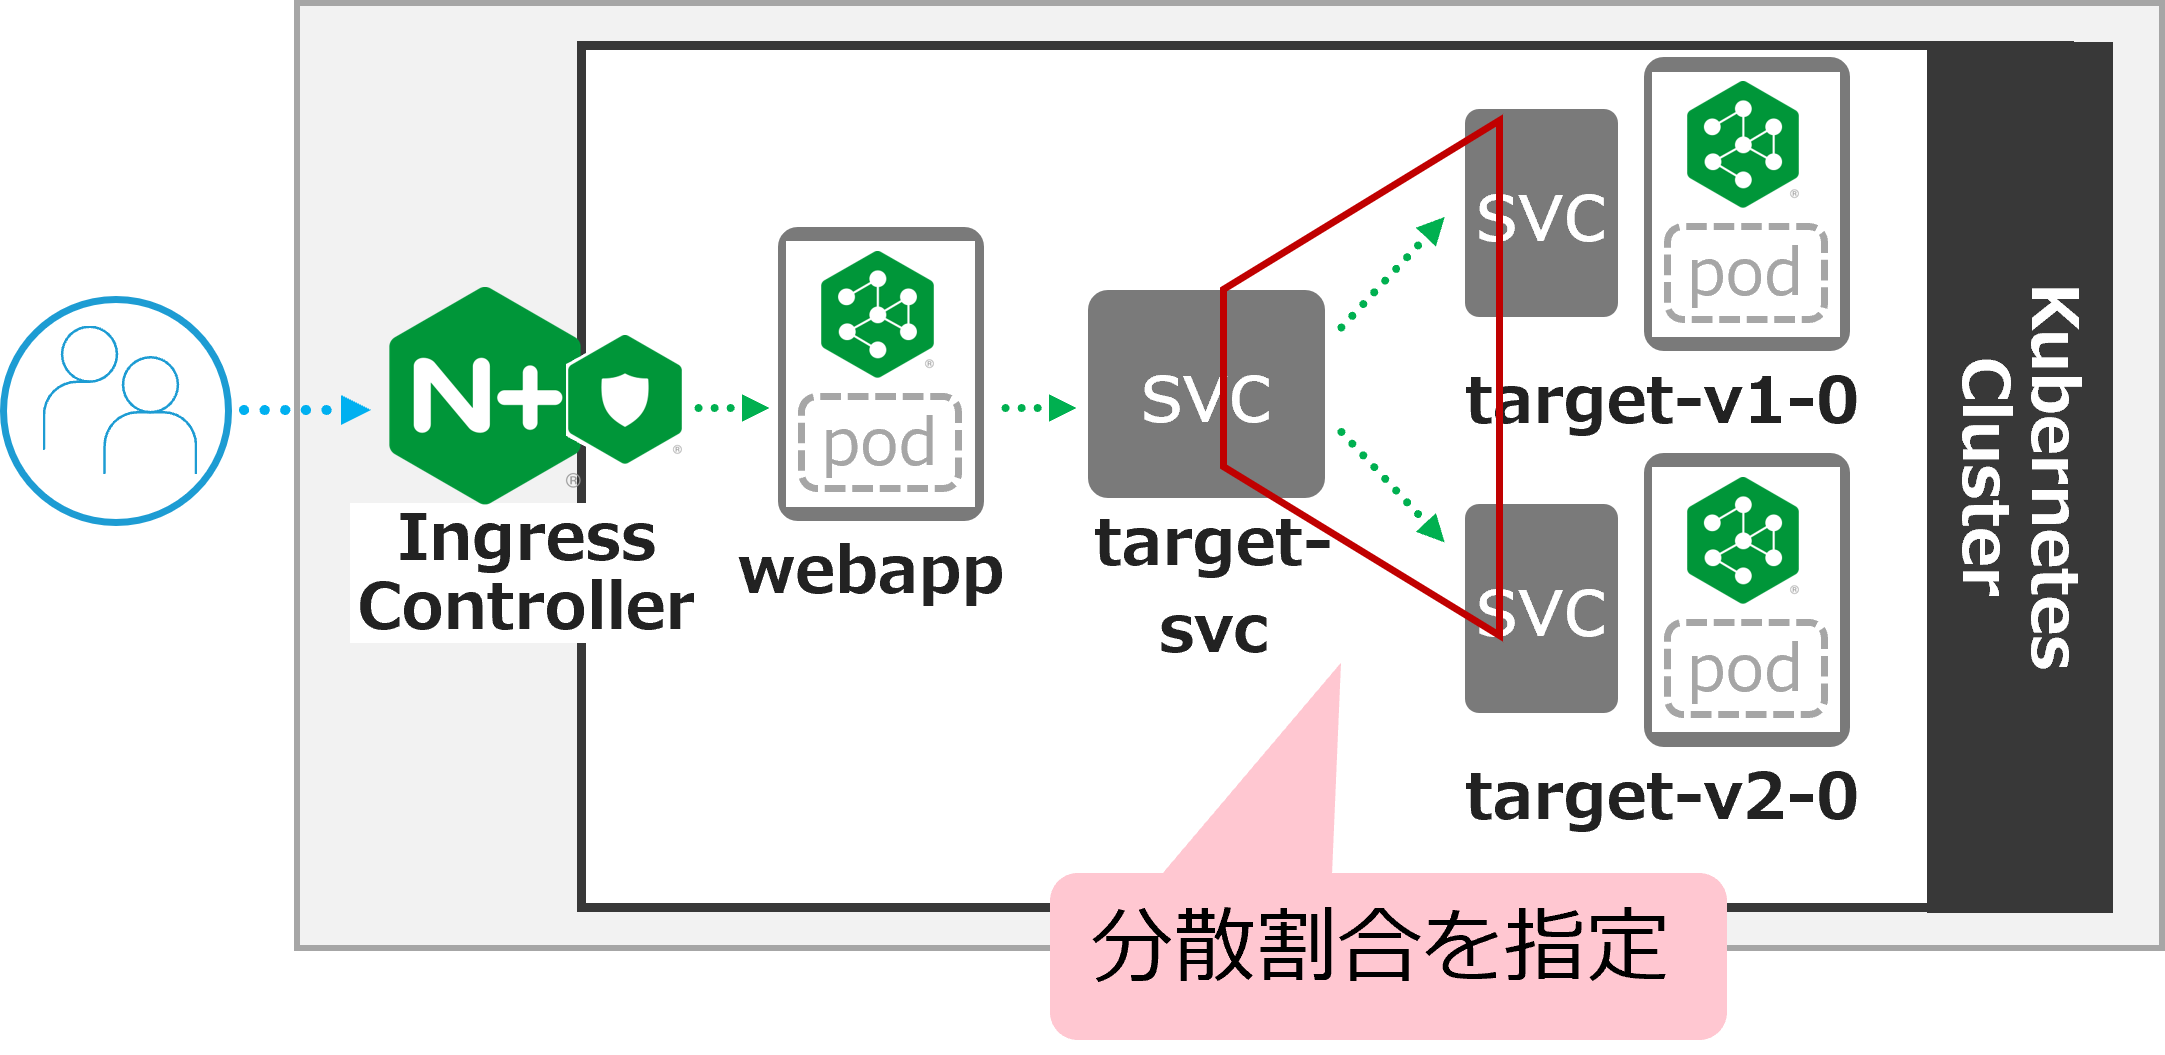
NICでの制御と異なり、NICの背後のアプリケーションは単一です。 そのアプリケーションの背後にあるアプリケーションのトラフィック分割が求められる状況を想定した構成となります。
1. NIC設定のデプロイ
設定の内容を確認します
## cd ~/f5j-nginx-k8s-apigw-lab/example
cat split-nsm-smi/nic-vs-nsmsplit.yaml
 1apiVersion: k8s.nginx.org/v1
 2kind: VirtualServer
 3metadata:
 4  name: webapp
 5spec:
 6  host: webapp.example.com
 7  upstreams:
 8  - name: webapp-svc
 9    service: webapp-svc
10    port: 80
11  routes:
12  - path: /
13    action:
NICの設定内容は大変シンプルで、後段の webapp-svc へ転送する構成となります
設定をデプロイします
## cd ~/f5j-nginx-k8s-apigw-lab/example
kubectl apply -f split-nsm-smi/nic-vs-nsmsplit.yaml -n staging
正しく反映されたことを確認します
kubectl get vs webapp -n staging
1NAME     STATE   HOST                 IP    PORTS   AGE
2webapp   Valid   webapp.example.com                 25s
STATEが Valid であることを確認します
2. 動作確認
正しく疎通があることを確認します
curl -s -H "Host: webapp.example.com" http://localhost/
1target v1.0
複数回実行すると target v1.0 、 target v2.0 が交互に応答されることが確認できます
以下のコマンドで 6回 リクエストを送付します。結果を確認します
for i in {1..6}; do curl -s -H "Host: webapp.example.com" http://localhost/ ; done ;
1target v1.0
2target v2.0
3target v1.0
4target v2.0
5target v1.0
6target v2.0
v1 と v2 が交互に応答されていることがわかります。これは webapp-svc が、 target-svc に通信を転送した結果となります。
3. NSM設定のデプロイ (割合9:1)
NSMを使い target-svc から、 target-v1-0 `` 、 ``target-v2-0 に対する通信を対象に割合の指定を行います
## cd ~/f5j-nginx-k8s-apigw-lab/example
cat split-nsm-smi/nsm-split1.yaml
 1apiVersion: split.smi-spec.io/v1alpha3
 2kind: TrafficSplit
 3metadata:
 4  name: target-ts
 5spec:
 6  service: target-svc
 7  backends:
 8  - service: target-v1-0
 9    weight: 90
10  - service: target-v2-0
11    weight: 10
8-9行目で、
target-v1-0に対しwegiht 90(90%)、10-11行目で、target-v2-0に対しwegiht 10(10%)の割合を指定して転送します。
設定をデプロイします
## cd ~/f5j-nginx-k8s-apigw-lab/example
kubectl apply -f split-nsm-smi/nsm-split1.yaml -n staging
正しく反映されたことを確認します
kubectl get trafficsplit -n staging
1NAME        AGE
2target-ts   19s
4. NSM設定の動作確認 (割合9:1)
以下のコマンドで 20回 リクエストを送付します。結果を確認します
for i in {1..20}; do curl -s -H "Host: webapp.example.com" http://localhost/ ; done ;
 1target v1.0
 2target v1.0
 3target v1.0
 4target v1.0
 5target v1.0
 6target v2.0
 7target v1.0
 8target v1.0
 9target v1.0
10target v1.0
11target v1.0
12target v1.0
13target v1.0
14target v1.0
15target v1.0
16target v1.0
17target v1.0
18target v1.0
19target v1.0
20target v2.0
先程の設定では、均等(5:5)に分散されていた通信ですが、
v1 と v2 が指定の値に近い割合で応答が返答されていることが確認できます。
5. 不要設定の削除
不要な設定を削除します
## cd ~/f5j-nginx-k8s-apigw-lab/example
kubectl delete -f split-nsm-smi/nic-vs-nsmsplit.yaml -n staging
kubectl delete -f split-nsm-smi/nsm-split1.yaml -n staging
3. NIC/NSMのJWT制御
以下の構成で動作を確認します
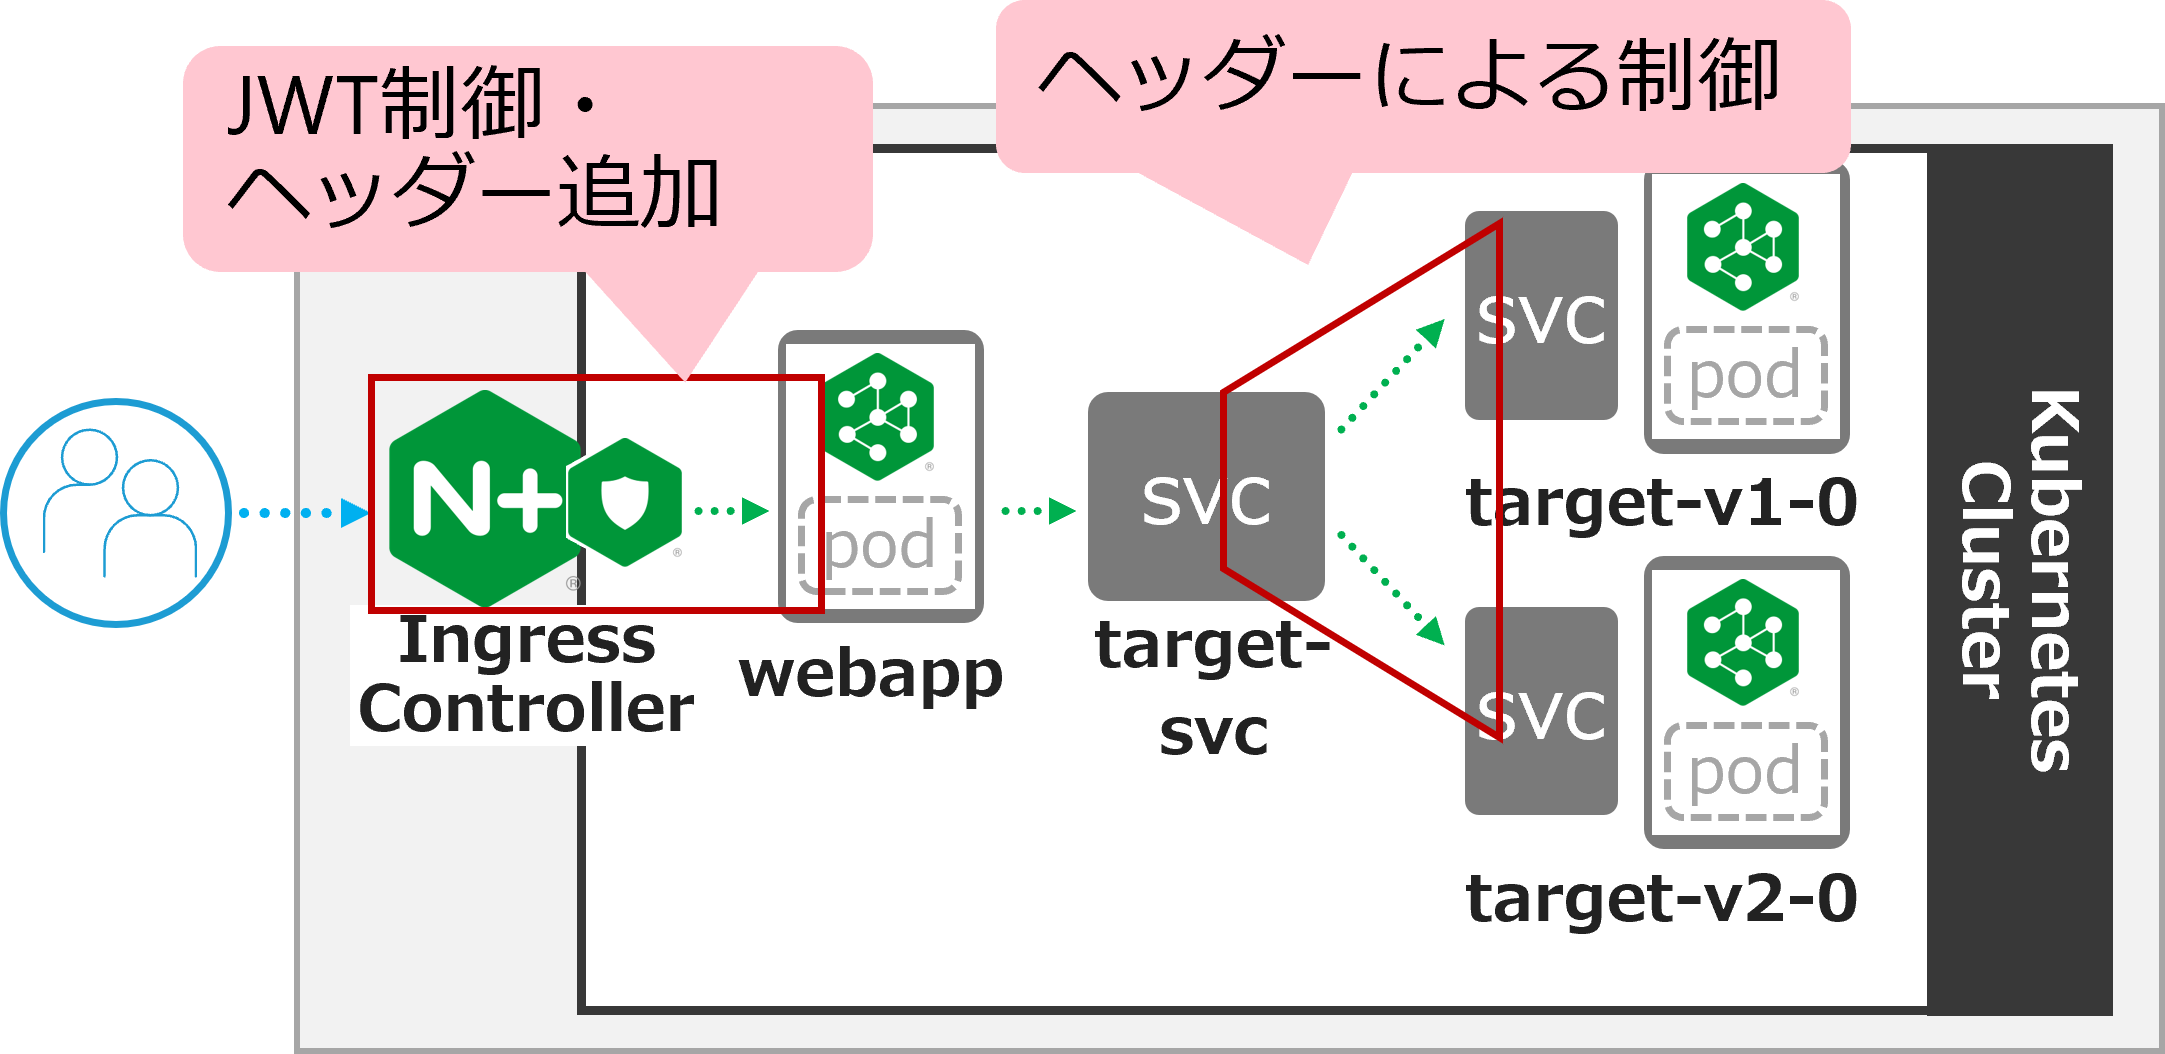
NICでクライアントのJWTの制御を行います。
適切なJWTである場合、JWTの情報をHTTPヘッダーに情報を付与します
付与されたHTTPヘッダーの情報を元にNSMで通信の制御を行います。この例では割合を指定し
v2に通信を転送します
1. 設定のデプロイ
利用するJWT Policyは
Ingress Controller で JWT Validation のデプロイ
を利用しています。
jwk-secret.yaml 、 jwt.yaml の解説はこちらを参照ください
その他の設定の内容を確認します
## cd ~/f5j-nginx-k8s-apigw-lab/example
cat jwt-nic-nsm/nic-vs-jwt-addheader.yaml
 1apiVersion: k8s.nginx.org/v1
 2kind: VirtualServer
 3metadata:
 4  name: webapp
 5spec:
 6  host: webapp.example.com
 7  policies:
 8  - name: jwt-policy
 9  upstreams:
10  - name: webapp-svc
11    service: webapp-svc
12    port: 80
13  routes:
14  - path: /
15    action:
16      proxy:
17        upstream: webapp-svc
18        requestHeaders:
19          pass: true
20          set:
21          - name: jwtscope
22            value: ${jwt_claim_scope}
7-8行目で、
webapp.example.com宛の通信に対してJWT Validationを設定しています16-22行目で、有効なJWTに指定された
Scopeの情報を、HTTPリクエストのjwtscopeというHTTPヘッダーに付与する設定をします
次にNSMの設定を確認します
## cd ~/f5j-nginx-k8s-apigw-lab/example
cat jwt-nic-nsm/nsm-split-jwt.yaml
基本的な設定は TrafficSplit です。
 1apiVersion: split.smi-spec.io/v1alpha3
 2kind: TrafficSplit
 3metadata:
 4  name: target-ts
 5spec:
 6  service: target-svc
 7  backends:
 8  - service: target-v1-0
 9    weight: 0
10  - service: target-v2-0
11    weight: 100
12  matches:
13  - kind: HTTPRouteGroup
14    name: target-scope
15---
16apiVersion: specs.smi-spec.io/v1alpha3
17kind: HTTPRouteGroup
18metadata:
19  name: target-scope
20spec:
21  matches:
22  - name: jwt-group2-users
23    headers:
24      jwtscope: ".*group2.*"
TrafficSplitは、
target-v2-0にすべての通信を転送する内容となります。ただし、 12-14行目に指定の通り条件を付与しています条件が16行目から記述されており、19行目の
target-scopeが 14行目に指定されていることがわかります条件の内容は21-24行目となり、
jwtscopeというHTTPヘッダーにgroup2という文字列が含まれている場合該当する、という内容を指定しています。
設定を反映します
## cd ~/f5j-nginx-k8s-apigw-lab/example
kubectl apply -f jwt-nic-nsm/jwk-secret.yaml -n staging
kubectl apply -f jwt-nic-nsm/jwt.yaml -n staging
kubectl apply -f jwt-nic-nsm/nic-vs-jwt-addheader.yaml -n staging
kubectl apply -f jwt-nic-nsm/nsm-split-jwt.yaml -n staging
2. 動作確認
JWT Validationの動作を確認します
curl -s -H "Host: webapp.example.com" http://localhost/
1<html>
2<head><title>401 Authorization Required</title></head>
3<body>
4<center><h1>401 Authorization Required</h1></center>
5<hr><center>nginx/1.21.6</center>
6</body>
7</html>
401 Authorization Required が応答されていることが確認できます
次に適切なJWTをJWT Policyで指定した通り Cookie の Token に指定して通信を行います
## cd ~/f5j-nginx-k8s-apigw-lab/example
curl -s -H "Host: webapp.example.com" http://localhost/ -H "Token: `cat jwt-nic-nsm/nginx1.jwt`"
1target v1.0
エラーなく応答が確認できました
複数回のリクエストを実行します。予め用意したJWTの nginx1.jwt と nginx3.jwt の動作の違いを確認します
## cd ~/f5j-nginx-k8s-apigw-lab/example
for i in {1..4}; do curl -s -H "Host: webapp.example.com" http://localhost/ -H "Token: `cat jwt-nic-nsm/nginx1.jwt`" ;done;
1target v1.0
2target v2.0
3target v1.0
4target v2.0
## cd ~/f5j-nginx-k8s-apigw-lab/example
for i in {1..4}; do curl -s -H "Host: webapp.example.com" http://localhost/ -H "Token: `cat jwt-nic-nsm/nginx3.jwt`" ;done;
1target v2.0
2target v2.0
3target v2.0
4target v2.0
nginx1.jwt を指定した場合には、通信が均等に分散されていることが確認できます。
nginx3.jwt は v2.0 のみに通信が転送されていることが確認できます。これは、NIC / NSMで指定したポリシーが正しく動作していることを示します
この条件の設定を組み合わせることで、詳細な条件をKubernetes内部の通信に適用することが可能となります。
3. 不要設定の削除
不要な設定を削除します
## cd ~/f5j-nginx-k8s-apigw-lab/example
kubectl delete -f jwt-nic-nsm/jwk-secret.yaml -n staging
kubectl delete -f jwt-nic-nsm/jwt.yaml -n staging
kubectl delete -f jwt-nic-nsm/nic-vs-jwt-addheader.yaml -n staging
kubectl delete -f jwt-nic-nsm/nsm-split-jwt.yaml -n staging
4. JWT制御とWAFによる防御
以下の構成で動作を確認します
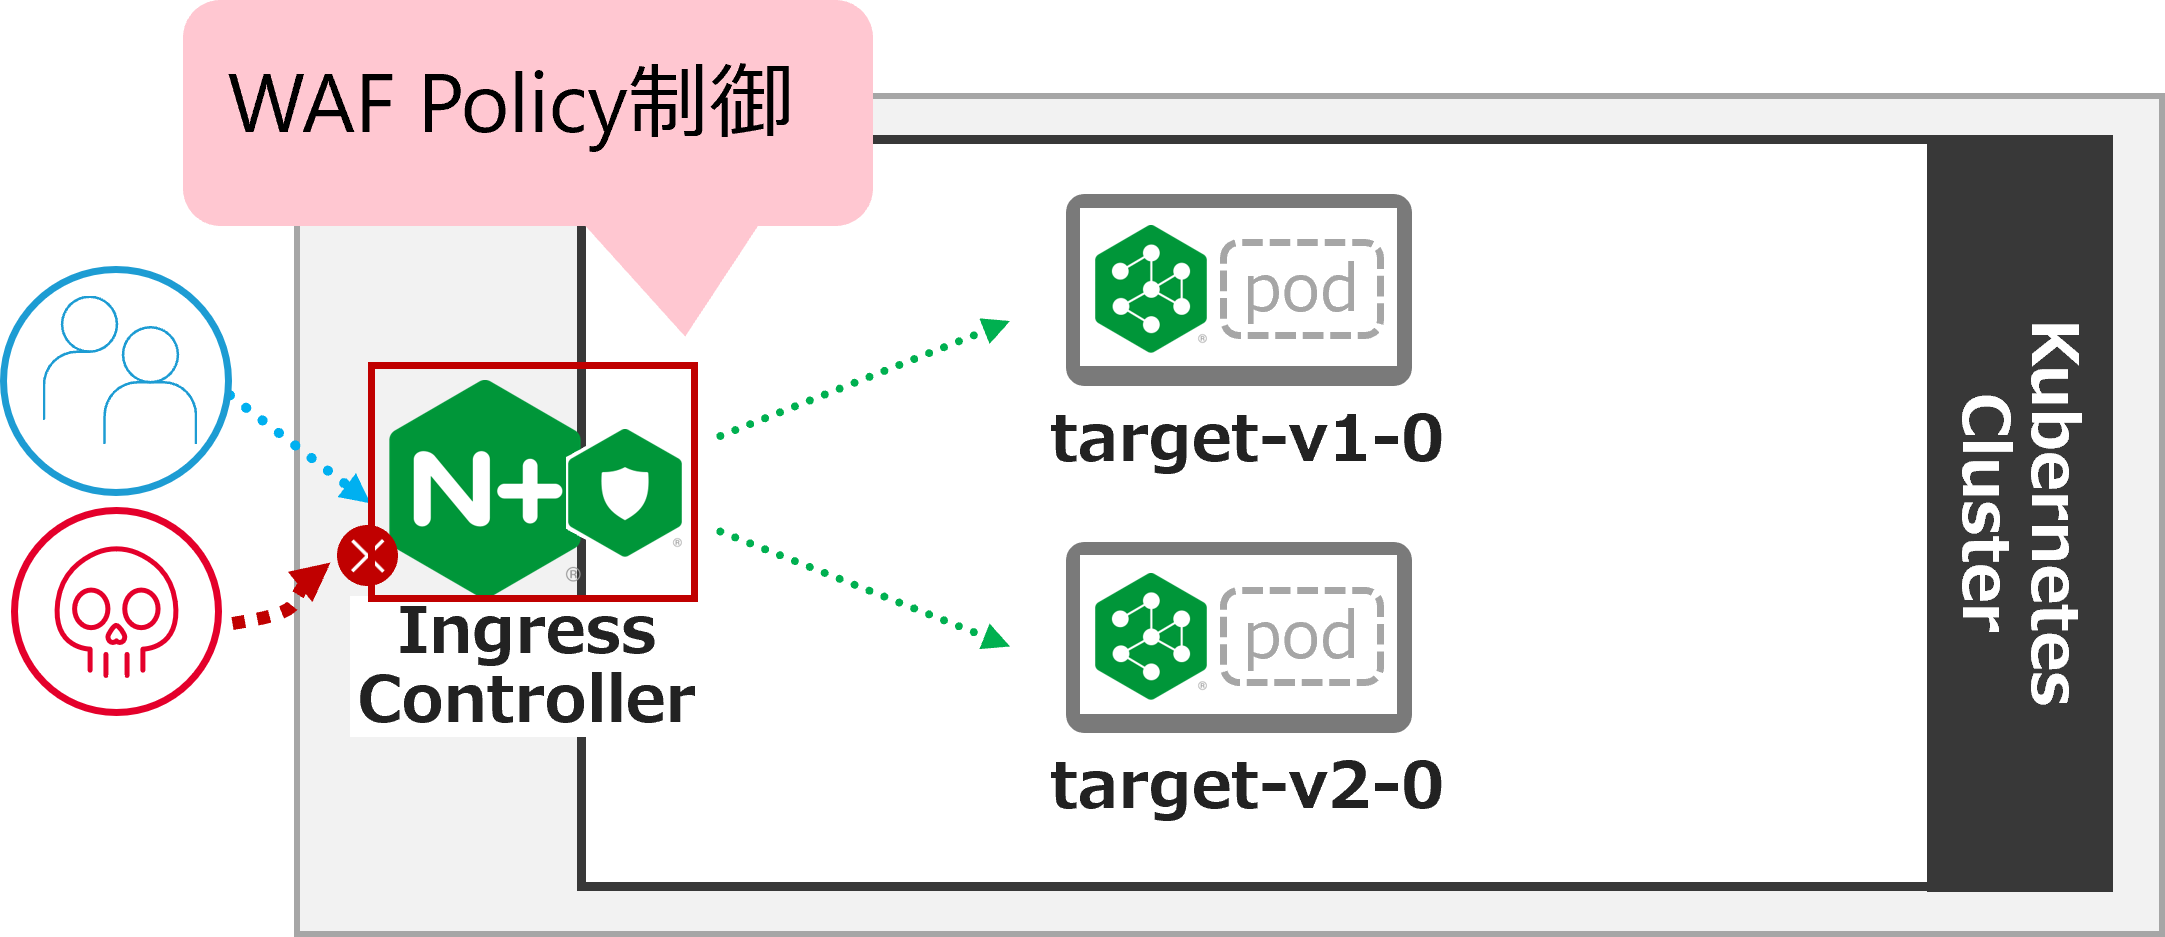
JWTによる通信制御はAPIを保護する有効な手段ですが、正しい認証情報を持ったクライアントが悪意あるプログラムなどにより想定外の動作を行うなどの場合が考えられます。 このような状況を想定して悪意ある通信を防御する方法を確認します。
1. 設定のデプロイ
設定の内容を確認します。 JWTに関する設定は 3. NIC/NSMのJWT制御 と同様に Ingress Controller で JWT Validation のデプロイ の内容を利用しています。
WAFの設定は最低限の設定を行い、外部からの攻撃をブロックできる設定としています。
## cd ~/f5j-nginx-k8s-apigw-lab/example
cat waf-nic-vs/simple-ap.yaml
 1apiVersion: appprotect.f5.com/v1beta1
 2kind: APPolicy
 3metadata:
 4  name: simple-ap
 5spec:
 6  policy:
 7    name: simple-ap
 8    applicationLanguage: utf-8
 9    enforcementMode: blocking
10    template:
11      name: POLICY_TEMPLATE_NGINX_BASE
enforcementMode で blocking と指定することでWAFの通信を防御します
WAFは数多くの設定により悪意ある通信をブロックすることが可能です。詳細を確認する場合、以下のページを参照してください。
## cd ~/f5j-nginx-k8s-apigw-lab/example
cat waf-nic-vs/nic-vs-waf-jwt.yaml
 1apiVersion: k8s.nginx.org/v1
 2kind: VirtualServer
 3metadata:
 4  name: nic
 5spec:
 6  host: nic.example.com
 7  policies:
 8  - name: waf-policy
 9  - name: jwt-policy
10  upstreams:
11  - name: target-v1
12    service: target-v1-0
13    port: 80
14  - name: target-v2
15    service: target-v2-0
16    port: 80
17  routes:
18  - path: /
19    splits:
20    - weight: 50
21      action:
22        pass: target-v1
23    - weight: 50
24      action:
25        pass: target-v2
8行目に
WAF、 9行目にJWTのポリシーを割り当てています。この様に設定することでnic.example.comに対する通信に対しJWT Validation及びWAFの防御が可能になりますPolicyは
Host、Routeなど柔軟に指定することが可能です。詳細は NIC: VS/VSR のpoliciesFieldを参照ください
設定を反映します
## cd ~/f5j-nginx-k8s-apigw-lab/example
kubectl apply -f jwt-nic-nsm/jwk-secret.yaml -n staging
kubectl apply -f jwt-nic-nsm/jwt.yaml -n staging
kubectl apply -f waf-nic-vs/ap-logconf.yaml -n staging
kubectl apply -f waf-nic-vs/simple-ap.yaml -n staging
kubectl apply -f waf-nic-vs/waf.yaml -n staging
kubectl apply -f waf-nic-vs/nic-vs-waf-jwt.yaml -n staging
反映の結果を確認します
kubectl get aplogconf,appolicy,policy -n staging
1NAME                                  AGE
2aplogconf.appprotect.f5.com/logconf   21s
3
4NAME                                   AGE
5appolicy.appprotect.f5.com/simple-ap   21s
6
7NAME                              STATE   AGE
8policy.k8s.nginx.org/jwt-policy   Valid   22s
9policy.k8s.nginx.org/waf-policy   Valid   20s
2. 動作確認
対象のFQDNにJWTを指定せず、動作確認します
curl -s -H "Host: nic.example.com" http://localhost/
1<html>
2<head><title>401 Authorization Required</title></head>
3<body>
4<center><h1>401 Authorization Required</h1></center>
5<hr><center>nginx/1.21.6</center>
6</body>
7</html>
401 Authorization Required が応答されることがわかります。適切に JWT Validation が動作しています
適切なJWTを指定し、動作確認します
curl -s -H "Host: nic.example.com" http://localhost/ -H "Token: `cat jwt-nic-nsm/nginx1.jwt`"
1target v1.0
正しい応答が確認できます
この正しいJWTを提示している通信で攻撃トラフィックを送信します
curl -s -H "Host: nic.example.com" "http://localhost//?<script>" -H "Token: `cat jwt-nic-nsm/nginx1.jwt`"
1<html><head><title>Request Rejected</title></head><body>The requested URL was rejected.Please consult with your administrator.<br><br>
2Your support ID is:   16465265100495552517<br><br><a href='javascript:history.back();'>[Go Back]</a>
3</body></html>
Request Rejected と表示されエラーが応答されました
この様にVSで複数のポリシーを指定することにより、正しいJWTを持つクライアントが悪意ある通信を行った際にも防御することができることが確認できました
3. 不要設定の削除
不要な設定を削除します
## cd ~/f5j-nginx-k8s-apigw-lab/example
kubectl delete -f jwt-nic-nsm/jwk-secret.yaml -n staging
kubectl delete -f jwt-nic-nsm/jwt.yaml -n staging
kubectl delete -f waf-nic-vs/ap-logconf.yaml -n staging
kubectl delete -f waf-nic-vs/simple-ap.yaml -n staging
kubectl delete -f waf-nic-vs/waf.yaml -n staging
kubectl delete -f waf-nic-vs/nic-vs-waf-jwt.yaml -n staging
5. NICによる条件に応じた制御
以下の構成で動作を確認します
request_path , methods , headers による通信制御を確認します
1. 設定のデプロイ
設定の内容を確認します
## cd ~/f5j-nginx-k8s-apigw-lab/example
cat << EOF > ./jwt-nic-nsm/nic-vs-acl.yaml
apiVersion: k8s.nginx.org/v1
kind: VirtualServer
metadata:
  name: nic
spec:
  host: nic.example.com
  policies:
  upstreams:
  - name: target-svc
    service: target-svc
    port: 80
  routes:
  - path: ~ /.*valid.*
    action:
      pass: target-svc
  - path: /
    matches:
    - conditions:
      - header: X-Type
        value: valid
      action:
        pass: target-svc
    - conditions:
      - variable: $request_method
        value: POST
      action:
        pass: target-svc
    action:
      return:
        code: 403
        type: text/plain
        body: "Error\n"
EOF
cat jwt-nic-nsm/nic-vs-acl.yaml
 1apiVersion: k8s.nginx.org/v1
 2kind: VirtualServer
 3metadata:
 4  name: nic
 5spec:
 6  host: nic.example.com
 7  policies:
 8  upstreams:
 9  - name: target-svc
10    service: target-svc
11    port: 80
12  routes:
13  - path: ~ /.*valid.*
14    action:
15      pass: target-svc
16  - path: /
17    matches:
18    - conditions:
19      - header: X-Type
20        value: valid
21      action:
22        pass: target-svc
23    - conditions:
24      - variable: $request_method
25        value: POST
26      action:
27        pass: target-svc
28    action:
29      return:
30        code: 403
31        type: text/plain
32        body: "Error\n"
13-15行目で、 PATHの条件を正規表現で指定し、
validの文字列が含まれる場合、target-svcに転送します19-22行目で、
X-TypeというHTTP Headerの値をチェックしvalidである場合、target-svcに転送します24-27行目で、
$request_methodという変数を指定しHTTP MethodがPOSTである場合、target-svcに転送しますその他の通信は、
path: /の 28-32行目の条件に該当します
設定を反映します
## cd ~/f5j-nginx-k8s-apigw-lab/example
kubectl apply -f acl-nic-vs/nic-vs-acl.yaml -n staging
2. 動作確認
動作を確認します
まずシンプルなリクエストを送付し、結果を確認します
curl -v -H "Host: nic.example.com" http://localhost/
 1*   Trying 127.0.0.1:80...
 2* TCP_NODELAY set
 3* Connected to localhost (127.0.0.1) port 80 (#0)
 4> GET / HTTP/1.1
 5> Host: nic.example.com
 6> User-Agent: curl/7.68.0
 7> Accept: */*
 8>
 9* Mark bundle as not supporting multiuse
10< HTTP/1.1 403 Forbidden
11< Server: nginx/1.21.6
12< Date: Wed, 30 Nov 2022 12:32:55 GMT
13< Content-Type: text/plain
14< Content-Length: 6
15< Connection: keep-alive
16<
17Error
通信を送付したところ 403 が応答されていることがわかります。curlコマンドではデフォルトのMethodがGETであり、指定したポリシーの条件に該当しないためエラーとなっています
ポリシーに記述したMethodでリクエストを送付します。
curl -v -H "Host: nic.example.com" http://localhost/ -X POST
 1*   Trying 127.0.0.1:80...
 2* TCP_NODELAY set
 3* Connected to localhost (127.0.0.1) port 80 (#0)
 4> POST / HTTP/1.1
 5> Host: nic.example.com
 6> User-Agent: curl/7.68.0
 7> Accept: */*
 8>
 9* Mark bundle as not supporting multiuse
10< HTTP/1.1 200 OK
11< Server: nginx/1.21.6
12< Date: Wed, 30 Nov 2022 12:37:24 GMT
13< Content-Type: text/plain
14< Content-Length: 12
15< Connection: keep-alive
16< X-Mesh-Request-ID: 3d4569c9fb09e210121aa3efca06ca85
17<
18target v1.0
4行目で POST で通信が送付され、 10行目で 200 OK 18行目で正しく応答が返されていることが確認できます
制御対象のURL ポリシーに記述したPathの条件を満たすリクエストを送付します。
curl -v -H "Host: nic.example.com" http://localhost/dummy/this-is-valid-path/a.jpg
 1*   Trying 127.0.0.1:80...
 2* TCP_NODELAY set
 3* Connected to localhost (127.0.0.1) port 80 (#0)
 4> GET /dummy/this-is-valid-path/a.jpg HTTP/1.1
 5> Host: nic.example.com
 6> User-Agent: curl/7.68.0
 7> Accept: */*
 8>
 9* Mark bundle as not supporting multiuse
10< HTTP/1.1 200 OK
11< Server: nginx/1.21.6
12< Date: Wed, 30 Nov 2022 12:38:02 GMT
13< Content-Type: image/jpeg
14< Content-Length: 12
15< Connection: keep-alive
16< X-Mesh-Request-ID: ef2205a2b89c70b653c642df14dc2f4d
17<
18target v2.0
19* Connection #0 to host localhost left intact
4行目で 指定のPATHに通信が送付され、 10行目で 200 OK 18行目で正しく応答が返されていることが確認できます
ポリシーに記述したCookieの条件を満たすリクエストを送付します。
curl -v -H "Host: nic.example.com" http://localhost/ -H "X-Type: valid"
 1*   Trying 127.0.0.1:80...
 2* TCP_NODELAY set
 3* Connected to localhost (127.0.0.1) port 80 (#0)
 4> GET / HTTP/1.1
 5> Host: nic.example.com
 6> User-Agent: curl/7.68.0
 7> Accept: */*
 8> X-Type: valid
 9>
10* Mark bundle as not supporting multiuse
11< HTTP/1.1 200 OK
12< Server: nginx/1.21.6
13< Date: Wed, 30 Nov 2022 12:38:41 GMT
14< Content-Type: text/plain
15< Content-Length: 12
16< Connection: keep-alive
17< X-Mesh-Request-ID: cc3e1e8df58f0a1200456d76a551f6c7
18<
19target v1.0
8行目で指定したHTTP Headerが付与された通信が送付され、 11行目で 200 OK 19行目で正しく応答が返されていることが確認できます
このサンプルでは、条件に該当する場合サービスに転送し、それ以外をエラーとする設定です。 condition は様々な条件を記述することが可能です。該当する処理をエラーだけでなくリダイレクト、その他通信と違うServiceに転送するなどが可能となります
3. 不要設定の削除
不要な設定を削除します
## cd ~/f5j-nginx-k8s-apigw-lab/example
kubectl delete -f acl-nic-vs/nic-vs-acl.yaml -n staging
6. NSMによる条件に応じた制御
以下の構成で動作を確認します
request_path , methods , headers による通信制御を確認します。
詳細は以降の設定で確認しますが、SMIの記述では 許可する条件 を指定することが可能となります。
5. NICによる条件に応じた制御 では条件に対して自由なActionを指定できましたが、その点が異なることを注意ください
1. 設定のデプロイ
ここで実施するNSMのSMIによる通信制御では、Deploymentに指定されたServiceAccountを確認し、その送信元・送信先ServiceAccountを指定し通信を制御します。
サービスアカウントを確認します
kubectl get sa -n staging
1NAME          SECRETS   AGE
2default       1         6d9h
3target-v1-0   1         11m
4target-v2-0   1         14s
5webapp        1         25s
DeploymentのPod Templateで指定されている Service Account を確認します
kubectl describe deployment -n staging | egrep 'Pod Template:|Service Account:|^Name:'
1Name:                   target-v1-0
2Pod Template:
3  Service Account:  target-v1-0
4Name:                   target-v2-0
5Pod Template:
6  Service Account:  target-v2-0
7Name:                   webapp
8Pod Template:
9  Service Account:  webapp
各Deploymentに対し、それぞれService Accountが指定されていることが確認できます。
設定の内容を確認します。VSの内容は 2. NSMのトラフィック分割(Canary Release) のNIC設定 と同じであり大変シンプルな内容のため割愛します。
NSMに指定するポリシーの内容を確認します。
## cd ~/f5j-nginx-k8s-apigw-lab/example
cat acl-nsm-smi/nsm-acl.yaml
 1apiVersion: specs.smi-spec.io/v1alpha3
 2kind: HTTPRouteGroup
 3metadata:
 4  name: route-group
 5spec:
 6  matches:
 7  - name: method
 8    methods:
 9    - POST
10  - name: path
11    pathRegex: "/.*valid.*"
12  - name: header
13    headers:
14      X-Type: "valid"
15
16---
17apiVersion: access.smi-spec.io/v1alpha2
18kind: TrafficTarget
19metadata:
20  name: traffic-target-v1
21spec:
22  destination:
23    kind: ServiceAccount
24    name: target-v1-0
25  rules:
26  - kind: HTTPRouteGroup
27    name: route-group
28    matches:
29    - method
30    - path
31    - header
32  sources:
33  - kind: ServiceAccount
34    name: webapp
35
36---
37apiVersion: access.smi-spec.io/v1alpha2
38kind: TrafficTarget
39metadata:
40  name: traffic-target-v2
41spec:
42  destination:
43    kind: ServiceAccount
44    name: target-v2-0
45  rules:
46  - kind: HTTPRouteGroup
47    name: route-group
48    matches:
49    - method
50    - path
51    - header
52  sources:
53  - kind: ServiceAccount
54    name: webapp
1-14行目で、対象とする条件を指定します。kind は
HTTPRouteGroupとなり、オブジェクト名はroute-groupです条件は以下の三種類となります
7-9行目: HTTP Method で
POSTを指定10-11行目: path で
"/.*valid.*"を指定し、validが含まれる pathを対象とする12-14行目: HTTP Header を対象とし、
X-Typeの値がvalidとなっているものを対象とする
17-34行目が、
webappからtarget-v1-0に対する設定、27-54行目が、webappからtarget-v2-0に対する設定となりますこれらの違いは destination のみで、24行目で
target-v1-0、 44行目でtarget-v2-0を指定しています。その他の内容は同様です
設定を反映します
## cd ~/f5j-nginx-k8s-apigw-lab/example
kubectl apply -f acl-nsm-smi/nic-vs-acl.yaml -n staging
kubectl apply -f acl-nsm-smi/nsm-acl.yaml -n staging
2. 動作確認
動作を確認します
まずシンプルなリクエストを送付し、結果を確認します
curl -s -H "Host: webapp.example.com" http://localhost/
1<html>
2<head><title>403 Forbidden</title></head>
3<body>
4<center><h1>403 Forbidden</h1></center>
5<hr><center>nginx/1.21.6</center>
6</body>
7</html>
通信を送付したところ 403 が応答されていることがわかります。curlコマンドではデフォルトのMethodがGETであり、指定したポリシーの条件に該当しないためエラーとなっています
ポリシーに記述したMethodでリクエストを送付します。
curl -v -H "Host: webapp.example.com" http://localhost/ -X POST
 1*   Trying 127.0.0.1:80...
 2* TCP_NODELAY set
 3* Connected to localhost (127.0.0.1) port 80 (#0)
 4> POST / HTTP/1.1
 5> Host: webapp.example.com
 6> User-Agent: curl/7.68.0
 7> Accept: */*
 8>
 9* Mark bundle as not supporting multiuse
10< HTTP/1.1 200 OK
11< Server: nginx/1.21.6
12< Date: Wed, 30 Nov 2022 11:54:06 GMT
13< Content-Type: text/plain
14< Content-Length: 12
15< Connection: keep-alive
16< X-Mesh-Request-ID: 4a64156f62a3a613671af6e6650b9ac5
17< X-Mesh-Request-ID: 1df02eadd498d94aaaa0db3d76b901a3
18<
19target v1.0
20* Connection #0 to host localhost left intact
4行目で POST で通信が送付され、 10行目で 200 OK 19行目で正しく応答が返されていることが確認できます
ポリシーに記述したPathの条件を満たすリクエストを送付します。
curl -v -H "Host: webapp.example.com" http://localhost/dummy/this-is-valid-path/a.jpg
 1*   Trying 127.0.0.1:80...
 2* TCP_NODELAY set
 3* Connected to localhost (127.0.0.1) port 80 (#0)
 4> GET /dummy/this-is-valid-path/a.jpg HTTP/1.1
 5> Host: webapp.example.com
 6> User-Agent: curl/7.68.0
 7> Accept: */*
 8>
 9* Mark bundle as not supporting multiuse
10< HTTP/1.1 200 OK
11< Server: nginx/1.21.6
12< Date: Wed, 30 Nov 2022 11:58:30 GMT
13< Content-Type: image/jpeg
14< Content-Length: 12
15< Connection: keep-alive
16< X-Mesh-Request-ID: 0fa1636fee4c962e79fc7091bdb47e01
17< X-Mesh-Request-ID: 53d69013d169237c948b2a1ca0962428
18<
19target v2.0
4行目で 指定のPATHに通信が送付され、 10行目で 200 OK 19行目で正しく応答が返されていることが確認できます
ポリシーに記述したCookieの条件を満たすリクエストを送付します。
curl -v -H "Host: webapp.example.com" http://localhost/ -H "X-Type: valid"
 1*   Trying 127.0.0.1:80...
 2* TCP_NODELAY set
 3* Connected to localhost (127.0.0.1) port 80 (#0)
 4> GET / HTTP/1.1
 5> Host: webapp.example.com
 6> User-Agent: curl/7.68.0
 7> Accept: */*
 8> X-Type: valid
 9>
10* Mark bundle as not supporting multiuse
11< HTTP/1.1 200 OK
12< Server: nginx/1.21.6
13< Date: Wed, 30 Nov 2022 11:59:23 GMT
14< Content-Type: text/plain
15< Content-Length: 12
16< Connection: keep-alive
17< X-Mesh-Request-ID: aa232231e3b082bd8487a907ec3d8e32
18< X-Mesh-Request-ID: 103858cec23cdc936331e4009aa20759
19<
20target v1.0
21* Connection #0 to host localhost left intact
8行目で指定したHTTP Headerが付与された通信が送付され、 11行目で 200 OK 20行目で正しく応答が返されていることが確認できます
この様にコンテナ内部の通信に対して、Deploymentに指定したService Accountを使って通信の制御を行うことが可能です
3. 不要設定の削除
不要な設定を削除します
## cd ~/f5j-nginx-k8s-apigw-lab/example
kubectl delete -f acl-nsm-smi/nic-vs-acl.yaml -n staging
kubectl delete -f acl-nsm-smi/nsm-acl.yaml -n staging
7. NICのCircuit Breaker (Passive Health Check)
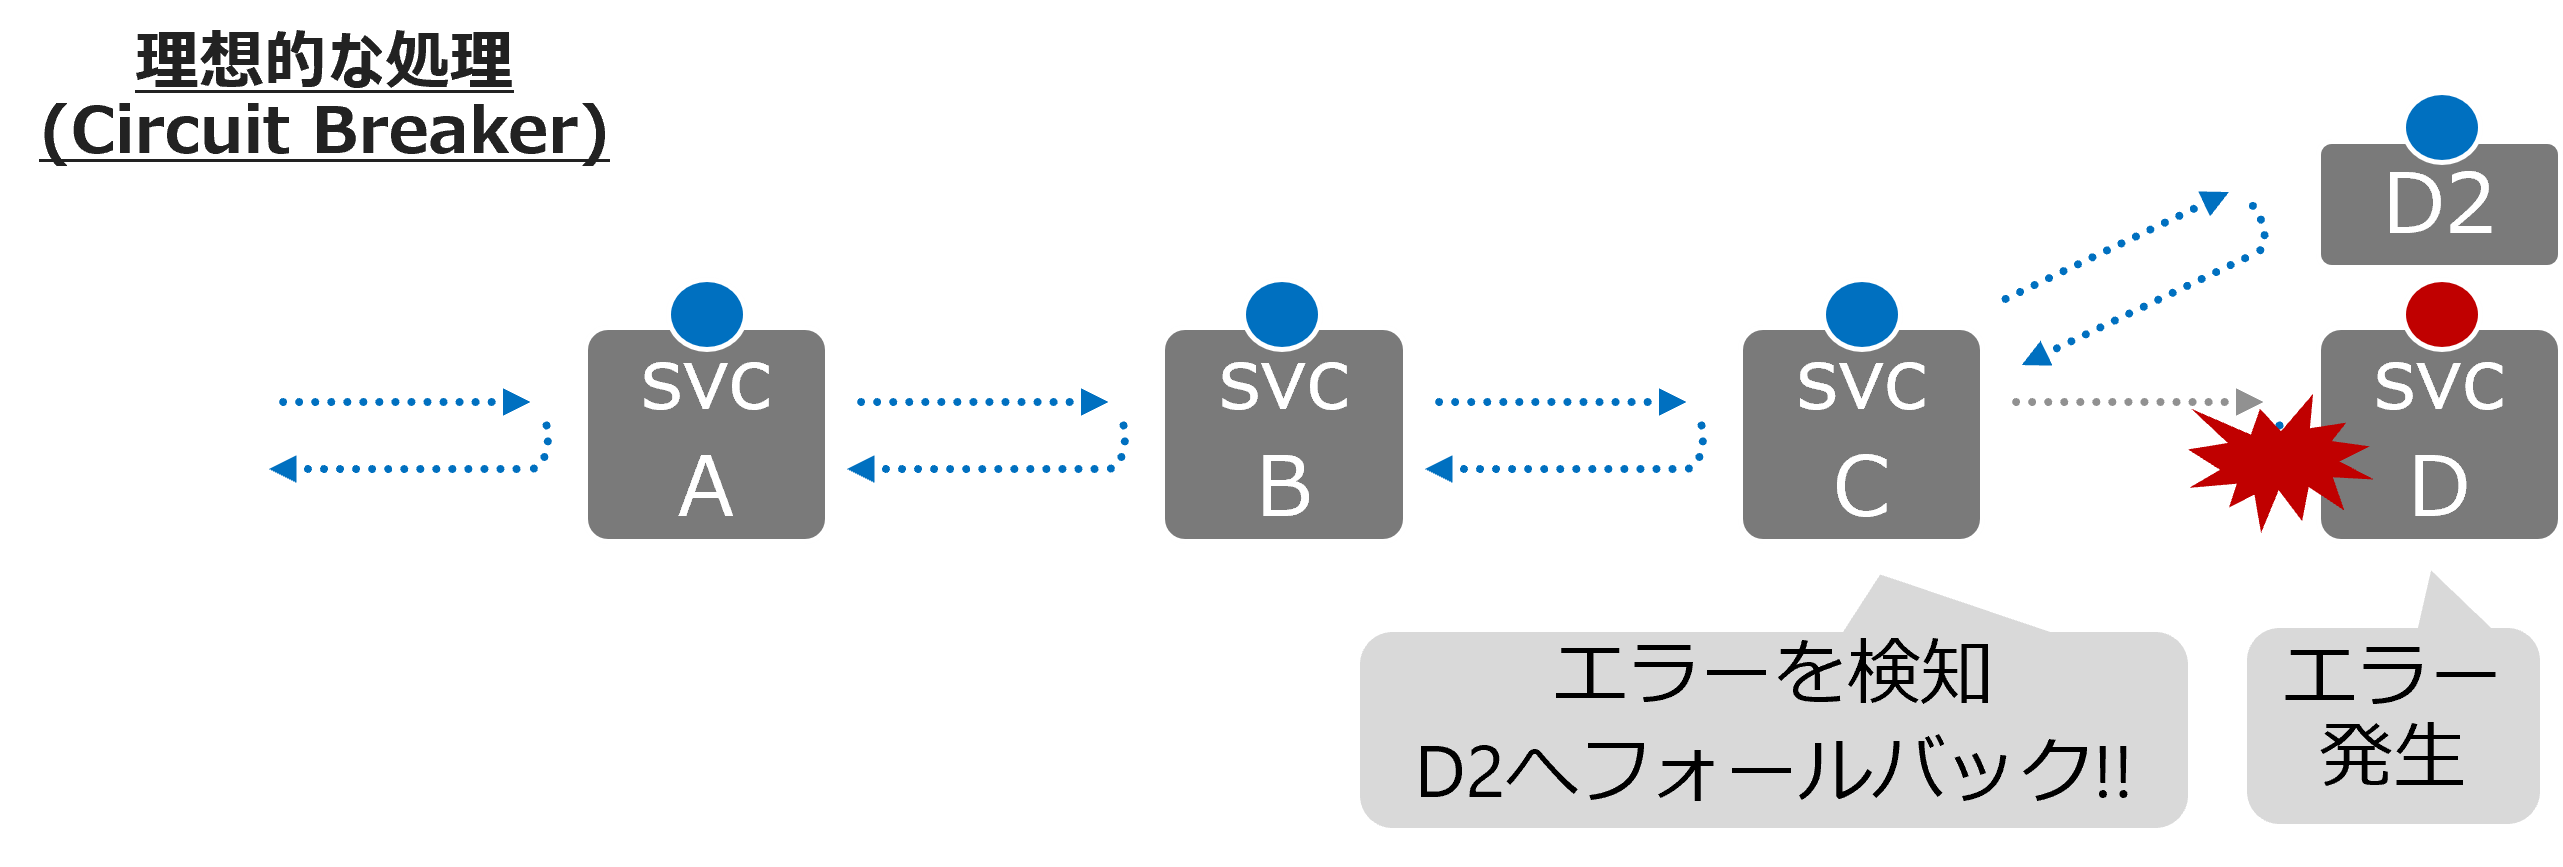
まずCircuit Breakerの機能について説明します。Kubernetes環境等でデプロイされる昨今のWebサービスは、機能ごとにサービスが分割され、APIで接続している場合があります。
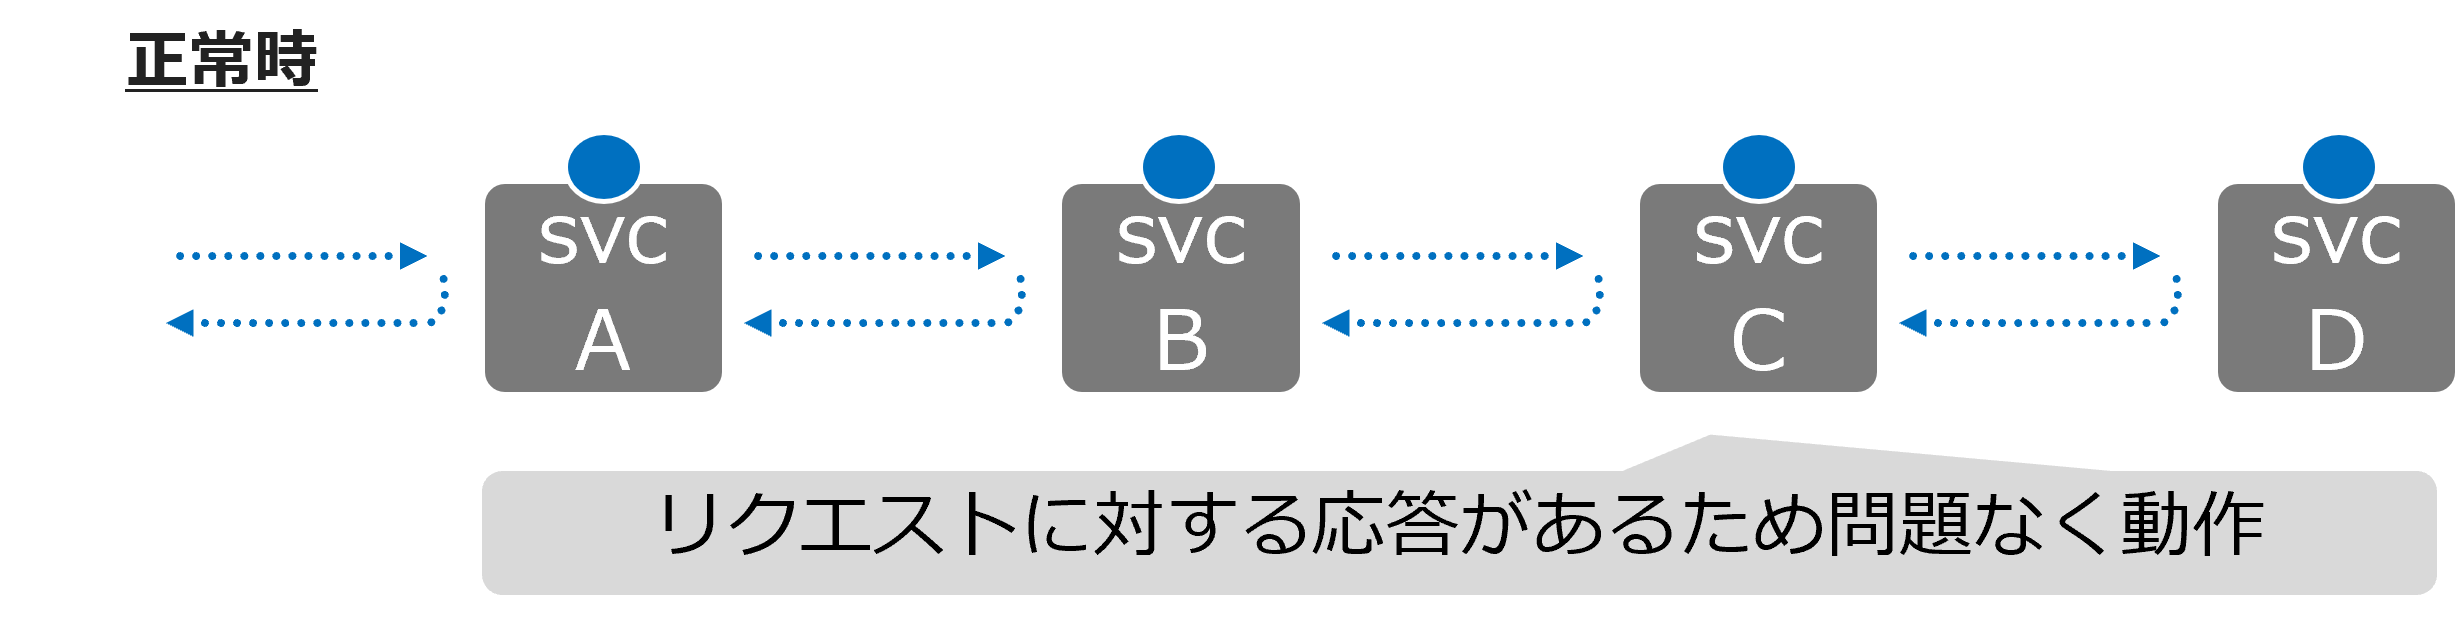
サービス内で障害がした際に、その障害が連続的に伝播し、サービス全体に影響が及ぶ状態となる可能性があります。
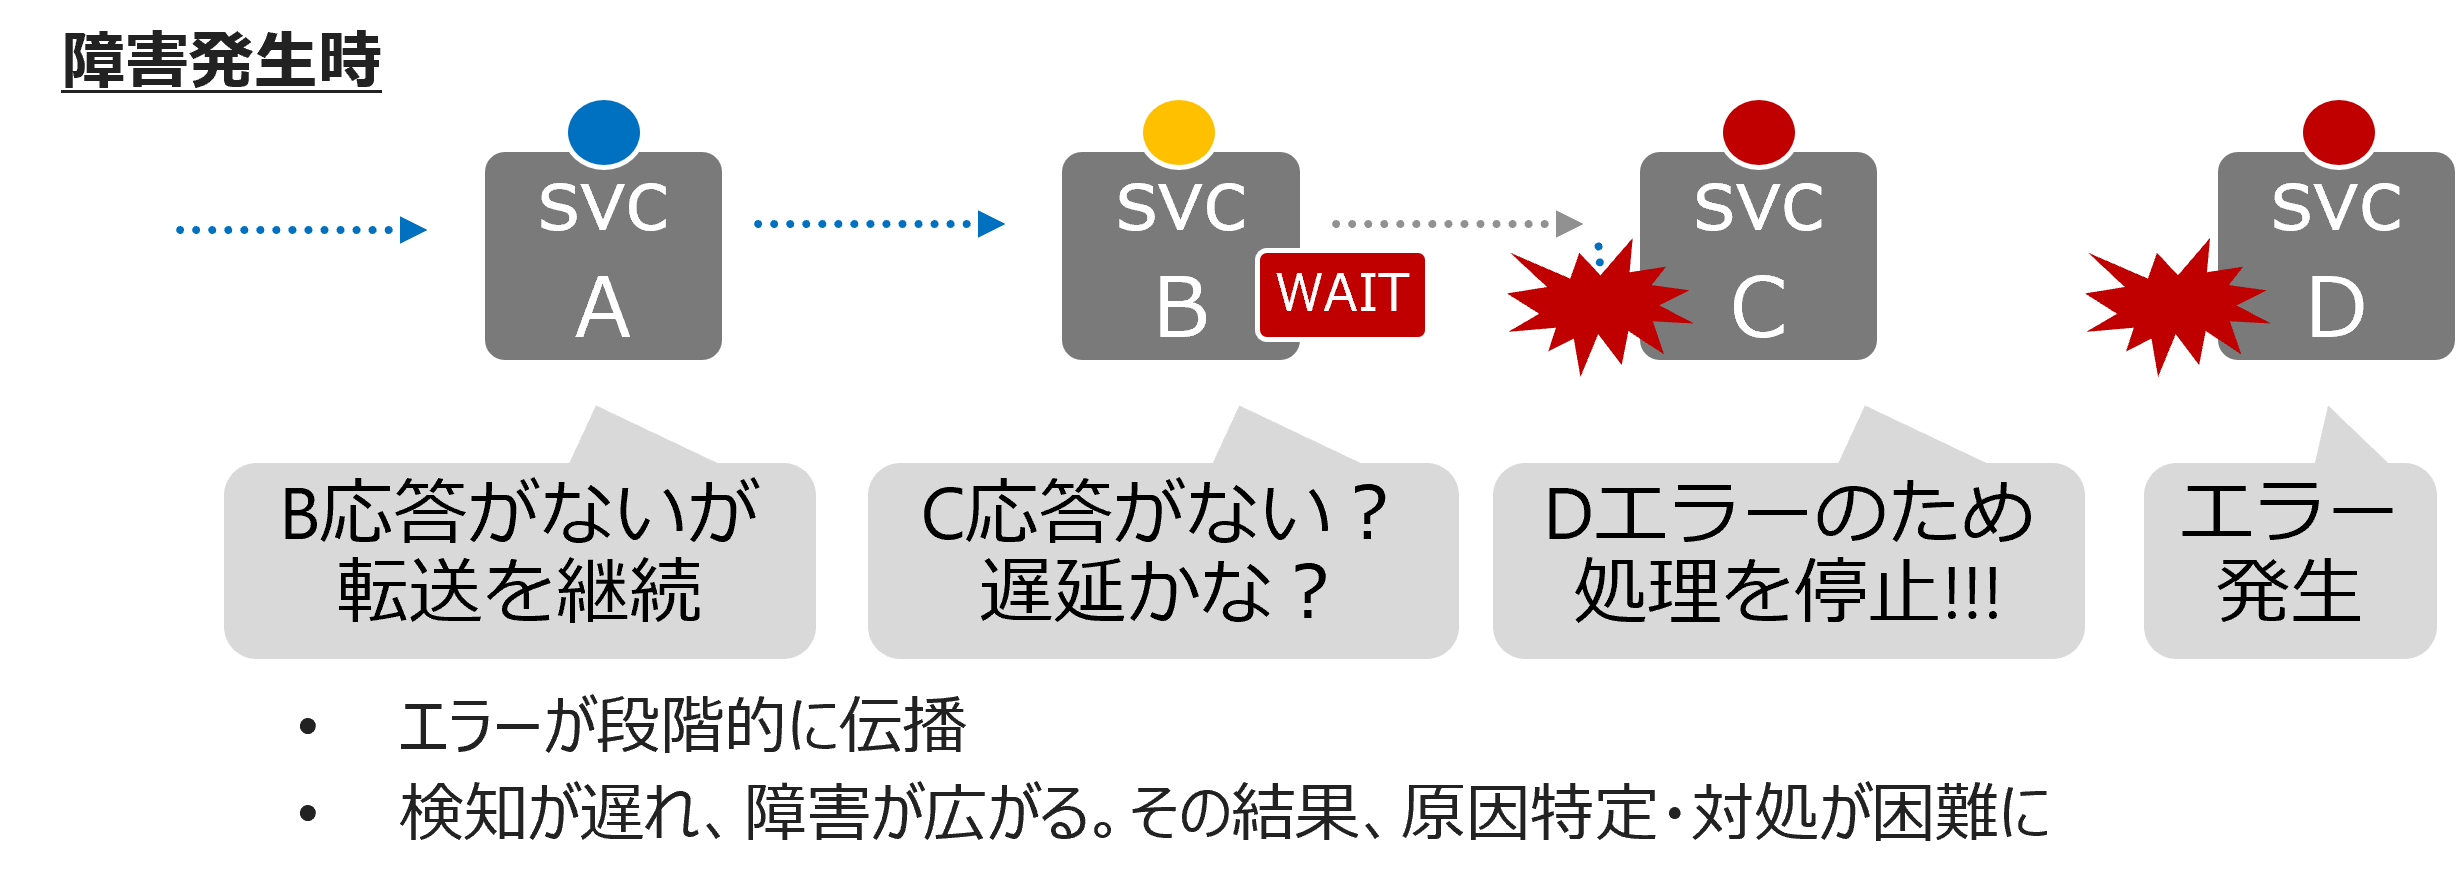
Circuit Breakerは、この障害の初期の時点で適切なフォールバックなどを実施することにより、サービス全体の停止や障害規模の拡大を防ぐことを目的とした機能です。
Circuit Breakerの動作を確認します。以下の構成で動作を確認します
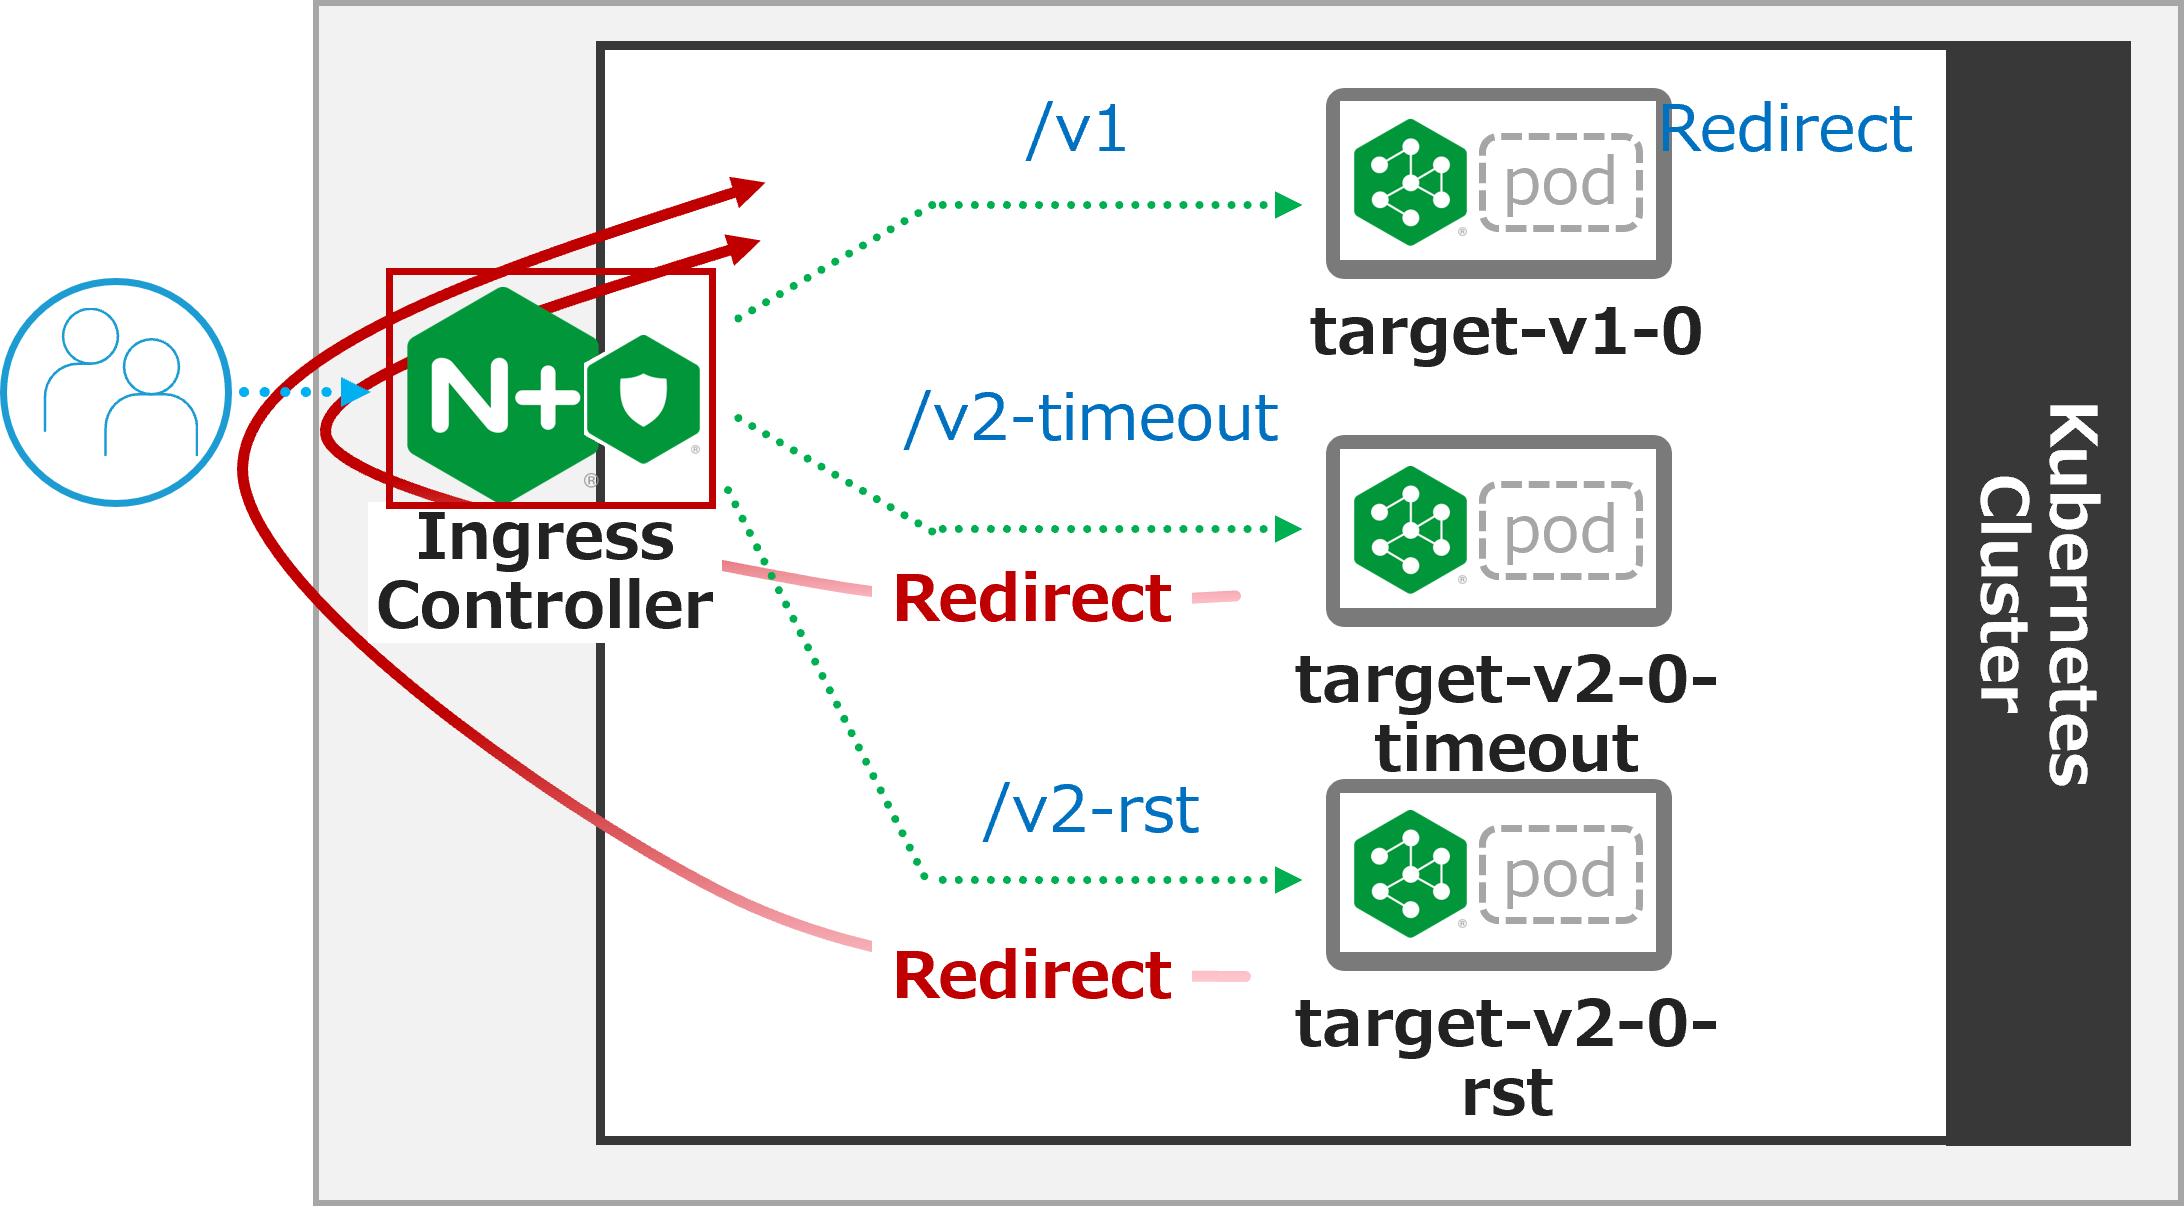
NICで転送先サービスの状態を監視します
エラーと判定された場合に、別のサービスへリダイレクトします
target-v2-0-timeoutとtarget-v2-0-rstを用意しそれぞれの動作を確認します
1. サンプルアプリケーションのデプロイ
エラーを発生させるため、サンプルアプリケーションをデプロイします。
## cd ~/f5j-nginx-k8s-apigw-lab/example
kubectl replace --force -f sample-app/target-v2.0-fail.yaml -n staging
デプロイの結果を確認します
kubectl get svc,pod -n staging
 1NAME                          TYPE        CLUSTER-IP       EXTERNAL-IP   PORT(S)   AGE
 2service/target-svc            ClusterIP   10.106.239.184   <none>        80/TCP    9m56s
 3service/target-v1-0           ClusterIP   10.108.92.55     <none>        80/TCP    132m
 4service/target-v2-0           ClusterIP   10.97.187.172    <none>        80/TCP    90m
 5service/target-v2-0-rst       ClusterIP   10.111.46.119    <none>        81/TCP    3s
 6service/target-v2-0-timeout   ClusterIP   10.108.182.110   <none>        80/TCP    4s
 7service/webapp-svc            ClusterIP   10.106.222.191   <none>        80/TCP    52s
 8
 9NAME                               READY   STATUS            RESTARTS   AGE
10pod/target-v1-0-6bc4b7d57f-klwk6   2/2     Running           0          132m
11pod/target-v2-0-847595548b-jbn5b   2/2     Running           0          4s
12pod/webapp-578d87f489-fjhvn        2/2     Running           0          52s
2. NIC設定のデプロイ・動作確認
まずは、通信を転送しエラーとなることを確認します。
NICに適用する設定の内容を確認します
## cd ~/f5j-nginx-k8s-apigw-lab/example
cat cb-passive-nic-vs/nic-vs-cb1.yaml
 1apiVersion: k8s.nginx.org/v1
 2kind: VirtualServer
 3metadata:
 4  name: nic
 5spec:
 6  host: nic.example.com
 7  upstreams:
 8  - name: target-v1
 9    service: target-v1-0
10    port: 80
11  - name: target-v2-timeout
12    service: target-v2-0-timeout
13    port: 80
14    fail-timeout: 20s
15    max-fails: 1
16    connect-timeout: 2s
17    send-timeout: 2s
18    read-timeout: 2s
19  - name: target-v2-rst
20    service: target-v2-0-rst
21    port: 81
22  routes:
23  - path: /v1
24    action:
25      pass: target-v1
26  - path: /v2-timeout
27    action:
28      pass: target-v2-timeout
29  - path: /v2-rst
30    action:
31      pass: target-v2-rst
14-18行目に、upstream
target-v2-timeoutに対する、Passive HealthCheckを設定しています16-18行目に、各種タイムアウト値を指定しています
パラメータの詳細は VS/VSR Upstream を参照してください
23行目で、
/v1の場合target-v1への転送、 26行目で、/v2-timeoutの場合target-v2-timeoutへの転送、29行目で、/v2-rstの場合target-v2-rstへの転送を設定しています
設定を反映します
kubectl apply -f cb-passive-nic-vs/nic-vs-cb1.yaml -n staging
それぞれの動作を確認します
アプリケーションがエラーとならない /v1 宛の通信を確認します
curl -v -H "Host: nic.example.com" http://localhost/v1
 1*   Trying 127.0.0.1:80...
 2* TCP_NODELAY set
 3* Connected to localhost (127.0.0.1) port 80 (#0)
 4> GET /v1 HTTP/1.1
 5> Host: nic.example.com
 6> User-Agent: curl/7.68.0
 7> Accept: */*
 8>
 9* Mark bundle as not supporting multiuse
10< HTTP/1.1 200 OK
11< Server: nginx/1.21.6
12< Date: Wed, 28 Dec 2022 04:06:28 GMT
13< Content-Type: text/plain
14< Content-Length: 12
15< Connection: keep-alive
16< X-Mesh-Request-ID: 5ee860e2d2437c81304a4503bfa0db35
17<
18target v1.0
19* Connection #0 to host localhost left intact
期待の通り 200 OK が応答され、正しくレスポンスの文字列 target v1.0 が表示されています
アプリケーションがタイムアウトする /v2-timeout 宛の通信を確認します
date; curl -v -H "Host: nic.example.com" http://localhost/v2-timeout; date
 1Wed Dec 28 04:06:34 UTC 2022
 2*   Trying 127.0.0.1:80...
 3* TCP_NODELAY set
 4* Connected to localhost (127.0.0.1) port 80 (#0)
 5> GET /v2-timeout HTTP/1.1
 6> Host: nic.example.com
 7> User-Agent: curl/7.68.0
 8> Accept: */*
 9>
10* Mark bundle as not supporting multiuse
11< HTTP/1.1 504 Gateway Time-out
12< Server: nginx/1.21.6
13< Date: Wed, 28 Dec 2022 04:06:36 GMT
14< Content-Type: text/html
15< Content-Length: 167
16< Connection: keep-alive
17<
18<html>
19<head><title>504 Gateway Time-out</title></head>
20<body>
21<center><h1>504 Gateway Time-out</h1></center>
22<hr><center>nginx/1.21.6</center>
23</body>
24</html>
25* Connection #0 to host localhost left intact
26Wed Dec 28 04:06:36 UTC 2022
19行目に、
504 Gateway Time-outと応答されることが確認できます1行目と26行目の時間を比較し、curlコマンド実行前後の時間を確認すると約2秒であることが確認できます。これは先程確認したNICの設定のタイムアウト値と同様となっています
アプリケーションがRSTを返す /v2-rst 宛の通信を確認します
curl -v -H "Host: nic.example.com" http://localhost/v2-rst
 1*   Trying 127.0.0.1:80...
 2* TCP_NODELAY set
 3* Connected to localhost (127.0.0.1) port 80 (#0)
 4> GET /v2-rst HTTP/1.1
 5> Host: nic.example.com
 6> User-Agent: curl/7.68.0
 7> Accept: */*
 8>
 9* Mark bundle as not supporting multiuse
10< HTTP/1.1 502 Bad Gateway
11< Server: nginx/1.21.6
12< Date: Wed, 28 Dec 2022 04:07:13 GMT
13< Content-Type: text/html
14< Content-Length: 157
15< Connection: keep-alive
16<
17<html>
18<head><title>502 Bad Gateway</title></head>
19<body>
20<center><h1>502 Bad Gateway</h1></center>
21<hr><center>nginx/1.21.6</center>
22</body>
23</html>
24* Connection #0 to host localhost left intact
18行目に、
502 Bad Gatewayと応答されることが確認できます
3. CircuitBreakerのデプロイ・動作確認
エラーに対し、フォールバックを行うためフォールバックの設定を行います。
## cd ~/f5j-nginx-k8s-apigw-lab/example
cat cb-passive-nic-vs/nic-vs-cb2.yaml
 1apiVersion: k8s.nginx.org/v1
 2kind: VirtualServer
 3metadata:
 4  name: nic
 5spec:
 6  host: nic.example.com
 7  upstreams:
 8  - name: target-v1
 9    service: target-v1-0
10    port: 80
11  - name: target-v2-timeout
12    service: target-v2-0-timeout
13    port: 80
14    fail-timeout: 20s
15    max-fails: 1
16    connect-timeout: 2s
17    send-timeout: 2s
18    read-timeout: 2s
19  - name: target-v2-rst
20    service: target-v2-0-rst
21    port: 81
22  routes:
23  - path: /v1
24    action:
25      pass: target-v1
26  - path: /v2-timeout
27    action:
28      pass: target-v2-timeout
29    errorPages:
30    - codes: [504]
31      redirect:
32        code: 301
33        url: ${scheme}://nic.example.com/v1
34  - path: /v2-rst
35    location-snippets: |
36      error_page 502 =302 "${scheme}://${host}/v1?${args}";
37      proxy_intercept_errors on;
38    action:
39      pass: target-v2-rst
29-33行目に、
errorPageを指定します。このパラメータにより、対象のエラーコード(504)の場合の挙動を指定することができます。ここでは指定のパラメータでリダイレクトするよう指定しています35-37行目は、
location-snippetsでNGINXの設定を指定します。29-33行目の記述と比較し、より詳細なパラメータの指定が必要となる場合にはこのようにコンフィグを記述することが可能ですerrorPageのパラメータの詳細は VS/VSR ErrorPage を参照してくださいlocation-snipetsで記述した各Directiveの詳細は error_page 、 proxy_intercept_errors を参照してください
設定をデプロイします
kubectl apply -f cb-passive-nic-vs/nic-vs-cb2.yaml -n staging
動作を確認します
アプリケーションがタイムアウトする /v2-timeout 宛の通信を確認します
date; curl -v -H "Host: nic.example.com" http://localhost/v2-timeout; date
 1Wed Dec 28 04:17:25 UTC 2022
 2*   Trying 127.0.0.1:80...
 3* TCP_NODELAY set
 4* Connected to localhost (127.0.0.1) port 80 (#0)
 5> GET /v2-timeout HTTP/1.1
 6> Host: nic.example.com
 7> User-Agent: curl/7.68.0
 8> Accept: */*
 9>
10* Mark bundle as not supporting multiuse
11< HTTP/1.1 301 Moved Permanently
12< Server: nginx/1.21.6
13< Date: Wed, 28 Dec 2022 04:17:27 GMT
14< Content-Type: text/html
15< Content-Length: 169
16< Connection: keep-alive
17< Location: http://nic.example.com/v1
18<
19<html>
20<head><title>301 Moved Permanently</title></head>
21<body>
22<center><h1>301 Moved Permanently</h1></center>
23<hr><center>nginx/1.21.6</center>
24</body>
25</html>
26* Connection #0 to host localhost left intact
27Wed Dec 28 04:17:27 UTC 2022
504 Gateway Time-outに変わり、301 Moved Permanentlyが応答されることが確認できます。レスポンスヘッダーの
Locationの値を確認すると、http://nic.example.com/v1となっていることが確認できます
アプリケーションがRSTを返す /v2-rst 宛の通信を確認します
curl -v -H "Host: nic.example.com" "http://localhost/v2-rst?a=1&b=2"
 1*   Trying 127.0.0.1:80...
 2* TCP_NODELAY set
 3* Connected to localhost (127.0.0.1) port 80 (#0)
 4> GET /v2-rst?a=1&b=2 HTTP/1.1
 5> Host: nic.example.com
 6> User-Agent: curl/7.68.0
 7> Accept: */*
 8>
 9* Mark bundle as not supporting multiuse
10< HTTP/1.1 302 Moved Temporarily
11< Server: nginx/1.21.6
12< Date: Wed, 28 Dec 2022 04:20:16 GMT
13< Content-Type: text/html
14< Content-Length: 145
15< Connection: keep-alive
16< Location: http://nic.example.com/v1?a=1&b=2
17<
18<html>
19<head><title>302 Found</title></head>
20<body>
21<center><h1>302 Found</h1></center>
22<hr><center>nginx/1.21.6</center>
23</body>
24</html>
25* Connection #0 to host localhost left intact
502 Bad Gatewayに変わり、302 Foundが応答されることが確認できます。レスポンスヘッダーの
Locationの値を確認すると、http://nic.example.com/v1?a=1&b=2となり、設定の通りArgsの値を取得しリダイレクトしていることが確認できます
4. 不要設定の削除
不要な設定を削除します
## cd ~/f5j-nginx-k8s-apigw-lab/example
kubectl delete -f cb-passive-nic-vs/nic-vs-cb2.yaml -n staging
kubectl delete --force -f sample-app/target-v2.0-fail.yaml -n staging
kubectl apply -f sample-app/target-v2.0-successful.yaml -n staging
8. NICのCircuit Breaker (Active Health Check)
RSTの場合には即座にエラーコードに合わせた処理を実施していますが、 タイムアウトが発生した場合には、設定値に応じた待ち時間が発生します。
クライアントの通信が発生する前に、NICがアプリケーションの状態を能動的に確認する機能がアクティブヘルスチェックとなります
1. サンプルアプリケーションのデプロイ
7. NICのCircuit Breaker(Passive) で利用したサンプルアプリケーションをデプロイします
## cd ~/f5j-nginx-k8s-apigw-lab/example
kubectl replace --force -f sample-app/target-v2.0-fail.yaml -n staging
デプロイの結果を確認します
kubectl get svc,pod -n staging
 1NAME                          TYPE        CLUSTER-IP       EXTERNAL-IP   PORT(S)   AGE
 2service/target-svc            ClusterIP   10.106.239.184   <none>        80/TCP    9m56s
 3service/target-v1-0           ClusterIP   10.108.92.55     <none>        80/TCP    132m
 4service/target-v2-0           ClusterIP   10.97.187.172    <none>        80/TCP    90m
 5service/target-v2-0-rst       ClusterIP   10.111.46.119    <none>        81/TCP    3s
 6service/target-v2-0-timeout   ClusterIP   10.108.182.110   <none>        80/TCP    4s
 7service/webapp-svc            ClusterIP   10.106.222.191   <none>        80/TCP    52s
 8
 9NAME                               READY   STATUS            RESTARTS   AGE
10pod/target-v1-0-6bc4b7d57f-klwk6   2/2     Running           0          132m
11pod/target-v2-0-847595548b-jbn5b   2/2     Running           0          4s
12pod/webapp-578d87f489-fjhvn        2/2     Running           0          52s
2. NICの設定をデプロイ
設定の内容を確認します
## cd ~/f5j-nginx-k8s-apigw-lab/example
cat cb-active-nic-vs/nic-vs-act-cb.yaml
 1apiVersion: k8s.nginx.org/v1
 2kind: VirtualServer
 3metadata:
 4  name: nic
 5spec:
 6  host: nic.example.com
 7  upstreams:
 8  - name: target-v1
 9    service: target-v1-0
10    port: 80
11  - name: target-v2-timeout
12    service: target-v2-0-timeout
13    port: 80
14    healthCheck:
15      enable: true
16      interval: 5s
17      fails: 3
18      passes: 3
19      port: 80
20      statusMatch: "! 400-599"
21  - name: target-v2-rst
22    service: target-v2-0-rst
23    port: 81
24  routes:
25  - path: /v1
26    action:
27      pass: target-v1
28  - path: /v2-timeout
29    action:
30      pass: target-v2-timeout
31    errorPages:
32    - codes: [502]
33      redirect:
34        code: 301
35        url: ${scheme}://nic.example.com/v1
14-20行目で、Active Health Checkの設定をしています。宛先サービスのinterval、port番号、応答
31-35行目で、エラーが発生した際のリダイレクトを設定します
設定をデプロイします
kubectl apply -f cb-active-nic-vs/nic-vs-act-cb.yaml -n staging
設定のデプロイ後、10秒ほど経過した後、NICのログを確認します
kubectl logs nic1-nginx-ingress-6764d84695-89ldh -n nginx-ingress --tail=10 | grep -a3 unhealthy
12022/12/28 04:28:55 [notice] 21#21: signal 17 (SIGCHLD) received from 620
22022/12/28 04:28:55 [notice] 21#21: worker process 620 exited with code 0
32022/12/28 04:28:55 [notice] 21#21: signal 29 (SIGIO) received
42022/12/28 04:29:04 [warn] 625#625: peer is unhealthy while checking status code, health check "vs_staging_nic_target-v2-timeout_match" of peer 192.168.127.29:80 in upstream "vs_staging_nic_target-v2-timeout", port 80
3行目が設定の反映に関するログとなります。その約10秒後に、healthcheckで unhealthy となったことが記録されています
3. 動作確認
動作を確認します
date; curl -v -H "Host: nic.example.com" http://localhost/v2-timeout; date
 1Wed Dec 28 04:31:33 UTC 2022
 2*   Trying 127.0.0.1:80...
 3* TCP_NODELAY set
 4* Connected to localhost (127.0.0.1) port 80 (#0)
 5> GET /v2-timeout HTTP/1.1
 6> Host: nic.example.com
 7> User-Agent: curl/7.68.0
 8> Accept: */*
 9>
10* Mark bundle as not supporting multiuse
11< HTTP/1.1 301 Moved Permanently
12< Server: nginx/1.21.6
13< Date: Wed, 28 Dec 2022 04:31:33 GMT
14< Content-Type: text/html
15< Content-Length: 169
16< Connection: keep-alive
17< Location: http://nic.example.com/v1
18<
19<html>
20<head><title>301 Moved Permanently</title></head>
21<body>
22<center><h1>301 Moved Permanently</h1></center>
23<hr><center>nginx/1.21.6</center>
24</body>
25</html>
26* Connection #0 to host localhost left intact
27Wed Dec 28 04:31:33 UTC 2022
リダイレクトの内容は 7. NICのCircuit Breaker(Passive) の手順と同様です。先程と異なりタイムアウトなく即座にリダイレクトしていることが確認できます
4. 不要設定の削除
不要な設定を削除します
## cd ~/f5j-nginx-k8s-apigw-lab/example
kubectl delete -f cb-passive-nic-vs/nic-vs-cb2.yaml -n staging
kubectl delete --force -f sample-app/target-v2.0-fail.yaml -n staging
kubectl apply -f sample-app/target-v2.0-successful.yaml -n staging
9. NSMのCircuit Breaker
Circuit Breakerの機能については 7. NICのCircuit Breaker(Passive) の内容を確認してください
NSMのCircuit Breakerの動作を確認します。以下の構成で動作を確認します
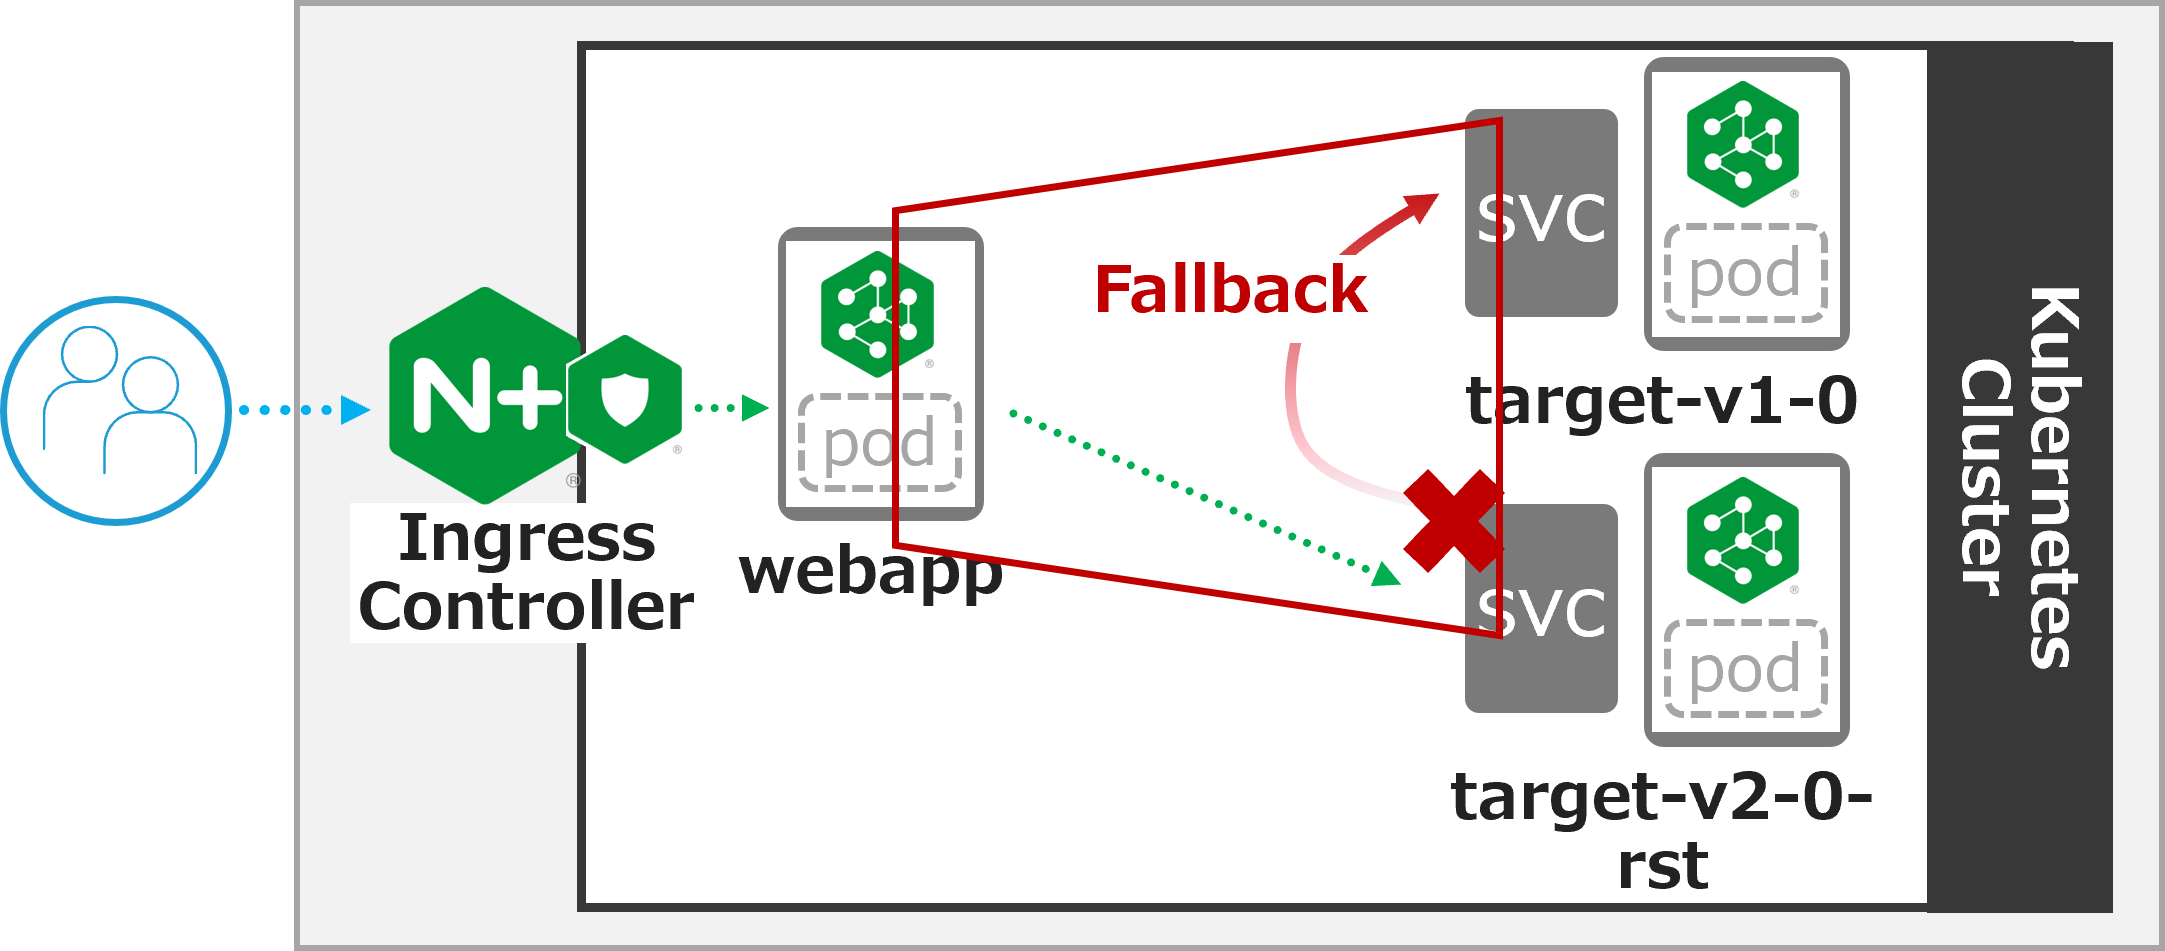
通信の中継を行う
webappの転送先をtarget-v2-0-rstのみに変更しますtarget-v2-0-rstは 7. NICのCircuit Breaker(Passive) の通りRSTを返すアプリケーションが動作しますNSMは通信のエラーを判定した場合に、別のサービスへフォールバックします
1. サンプルアプリケーションをデプロイ
サンプルアプリケーションをデプロイします。
kubectl replace --force -f sample-app/target-v2.0-fail.yaml -n staging
kubectl replace --force -f sample-app/webapp-gw-targetv2.yaml -n staging
デプロイの結果を確認します
kubectl get svc,pod -n staging
 1NAME                          TYPE        CLUSTER-IP       EXTERNAL-IP   PORT(S)   AGE
 2service/target-svc            ClusterIP   10.106.239.184   <none>        80/TCP    62m
 3service/target-v1-0           ClusterIP   10.108.92.55     <none>        80/TCP    3h5m
 4service/target-v2-0           ClusterIP   10.97.187.172    <none>        80/TCP    143m
 5service/target-v2-0-rst       ClusterIP   10.105.133.134   <none>        81/TCP    10s
 6service/target-v2-0-timeout   ClusterIP   10.99.212.248    <none>        80/TCP    10s
 7service/webapp-svc            ClusterIP   10.111.198.141   <none>        80/TCP    7s
 8
 9NAME                               READY   STATUS    RESTARTS   AGE
10pod/target-v1-0-6bc4b7d57f-klwk6   2/2     Running   0          3h5m
11pod/target-v2-0-847595548b-85z7r   2/2     Running   0          10s
12pod/webapp-578d87f489-89hwz        2/2     Running   0          7s
2. NIC設定のデプロイ・動作確認
設定の内容を確認します
NICは特殊な設定は行わず、シンプルな通信制御の内容となります
cat cb-nsm-smi/nic-vs-cb.yaml
 1apiVersion: k8s.nginx.org/v1
 2kind: VirtualServer
 3metadata:
 4  name: webapp
 5spec:
 6  host: webapp.example.com
 7  upstreams:
 8  - name: webapp-svc
 9    service: webapp-svc
10    port: 80
11  routes:
12  - path: /
13    action:
14      pass: webapp-svc
設定をデプロイします
kubectl apply -f cb-nsm-smi/nic-vs-cb.yaml -n staging
デプロイの結果を確認します
kubectl get vs webapp -n staging
1NAME     STATE   HOST                 IP    PORTS   AGE
2webapp   Valid   webapp.example.com                 40s
動作を確認します
curl -v -H "Host: webapp.example.com" http://localhost/
 1*   Trying 127.0.0.1:80...
 2* TCP_NODELAY set
 3* Connected to localhost (127.0.0.1) port 80 (#0)
 4> GET / HTTP/1.1
 5> Host: webapp.example.com
 6> User-Agent: curl/7.68.0
 7> Accept: */*
 8>
 9* Mark bundle as not supporting multiuse
10< HTTP/1.1 502 Bad Gateway
11< Server: nginx/1.21.6
12< Date: Wed, 28 Dec 2022 04:39:41 GMT
13< Content-Type: text/html
14< Content-Length: 157
15< Connection: keep-alive
16<
17<html>
18<head><title>502 Bad Gateway</title></head>
19<body>
20<center><h1>502 Bad Gateway</h1></center>
21<hr><center>nginx/1.21.6</center>
22</body>
23</html>
24* Connection #0 to host localhost left intact
エラーが表示されることが確認できます
2. CircuitBreaker(NSM)のデプロイ・動作確認
NSMに適用するCircuit Breakerの設定を確認します
## cd ~/f5j-nginx-k8s-apigw-lab/example
cat cb-nsm-smi/nsm-smi-cb.yaml
 1apiVersion: specs.smi.nginx.com/v1alpha1
 2kind: CircuitBreaker
 3metadata:
 4  name: circuit-breaker
 5spec:
 6  destination:
 7    kind: Service
 8    name: target-v2-0-rst
 9    namespace: staging
10  errors: 1
11  timeoutSeconds: 5
12  fallback:
13    service: staging/target-v1-0
14    port: 80
2行目の通り、
kind: CircuitBreakerを設定しています6-9行目で、CircuitBreakerの対象の宛先を指定します
10-11行目で、CircuitBreaker発生の条件を指定します
12-14行目で、フォールバックする先のサービスを指定します
この例では、
target-v2-0-rstでエラーとなった場合にstaging/target-v1-0:80にフォールバックする設定となります
kubectl apply -f cb-nsm-smi/nsm-smi-cb.yaml -n staging
正しく設定が反映されていることを確認します
kubectl get cb -n staging
1NAMESPACE   NAME              AGE
2staging     circuit-breaker   11s
3. 動作確認
動作を確認します
curl -v -H "Host: webapp.example.com" http://localhost/
 1*   Trying 127.0.0.1:80...
 2* TCP_NODELAY set
 3* Connected to localhost (127.0.0.1) port 80 (#0)
 4> GET / HTTP/1.1
 5> Host: webapp.example.com
 6> User-Agent: curl/7.68.0
 7> Accept: */*
 8>
 9* Mark bundle as not supporting multiuse
10< HTTP/1.1 200 OK
11< Server: nginx/1.21.6
12< Date: Wed, 28 Dec 2022 04:41:15 GMT
13< Content-Type: text/plain
14< Content-Length: 12
15< Connection: keep-alive
16< X-Mesh-Request-ID: d684b305ee38d3e78e938b548e67ee53
17< X-Mesh-Request-ID: 6b1ef6c1416917345b4e6d0522347ebd
18<
19target v1.0
20* Connection #0 to host localhost left intact
10行目で 200 OK が応答されており、19行目で フォールバックにより target v1.0 が確認できます
4. 不要設定の削除
不要な設定を削除します
## cd ~/f5j-nginx-k8s-apigw-lab/example
kubectl delete -f cb-nsm-smi/nic-vs-cb.yaml -n staging
kubectl delete -f cb-nsm-smi/nsm-smi-cb.yaml -n staging
kubectl delete --force -f sample-app/target-v2.0-fail.yaml -n staging
kubectl apply -f sample-app/target-v2.0-successful.yaml -n staging
kubectl delete --force -f sample-app/webapp-gw-targetv2.yaml -n staging
kubectl apply -f sample-app/webapp-gw.yaml -n staging